Migration of virtual machines between physical hosts or clusters is essential for cloud operators, allowing them to perform maintenance with little or no downtime, or balance compute and storage resources when necessary. CloudStack supports both live and cold migration (if supported by the hypervisor), and most hypervisors allow VM and volume migration in some form or another.
VMware vMotion provides both live and cold migration of VM and volumes. By leveraging vMotion with the APIs migrateVirtualMachine, migrateVirtualMachineWithVolume, migrateSystemVm and migrateVolume, migration of user and system VMs and their volume(s) can be performed easily in CloudStack.
However, until now CloudStack had the following limitations for VM and volume migration:
- Migration would fail when attempted between non-shared storages for VMware (i.e., when source and destination datastores are mounted on different hosts) – a typical setup for clusters with cluster-wide storage pools in CloudStack.
- When migrating stopped user VMs with multiple volumes from UI, CloudStack would migrate all volumes of the VM to the same storage pool. This would result in some volumes getting migrated to incompatible storage pools with storage tag mismatch for the volume’s disk offering.
- Only running system VMs can be migrated and migration can be done between hosts of the same cluster only.
This feature adds several improvements to CloudStack for migrating VMs and volumes between CloudStack clusters with VMware:
Cross-cluster migration
- To assist migration, the findHostsForMigration API has been improved to return hosts from different pods for user VMs and hosts from different clusters for system VMs in supported cases.
- User VMs can now be migrated between hosts belonging to clusters of the same or different pods.
- Volumes of user VMs can be migrated between cluster-wide storage pools of clusters belonging to different pods.
- System VMs can now be migrated between hosts belonging to clusters of the same pod.
Note: Migrating system VMs between hosts in different pods cannot be supported as system VMs acquire IP addresses from the IP range of the pod. Changing the public IP of the system VM would result in reconfiguring the VM and in the case of virtual routers it would also require reconfiguring various networking rules inside the VM which can be a risky and can cause huge downtime.
- Support for migration shared storages – Improvements have been made in CloudStack’s migration framework to leverage VMware’s vMotion capabilities to allow migration without shared storages. This would allow VMs running with volumes on storage pools of one cluster to be migrated to storage pools of a different cluster. Similarly, detached volumes can now be migrated between storage pools of different clusters with migrateVolume API or using the ‘Migrate Volume’ action in the UI, without going over Secondary Storage as before.
- Support for stopped user VM migration in migrateVirtualMachineWithVolume API – Stopped user VMs with multiple volumes can be migrated to different storage pools based on disk offering compatibility. An operator can choose to provide volume to pool mapping for all volumes of the VM or just the ROOT volume, in which case CloudStack will automatically map the remaining volumes to the compatible storage pool in the same destination cluster.
- UI improvements for user VM migration
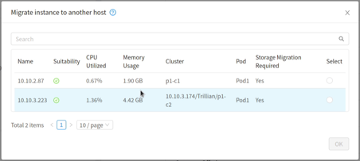
- The Migration form in the CloudStack UI has been updated to provide details of cluster and pod of the destination hosts:
-
- Migrate to another primary store action in UI will now utilize the migrateVirtualMachineWithVolume API to migrate stopped VMs. This will allow migrating different volumes to compatible storage(s) and not to the same storage pool.
- Support for stopped system VM migration in migrateSystemVm API
To enable migration of a stopped system VM a new parameter, storageid, has been added to the migrateSystemVm API. Since CloudStack does not allow the listing of volumes for system VMs, the operator may have to refer to the CloudStack database to find the source storage pool for a system VM. A cloudmonkey API call for migrating a stopped system VM to a different storage pool will look like this:
migrate systemvm virtualmachineid=<UUID_OF_SYSTEM_VM> storageid=<UUID_OF_DESTINATION_STORAGE_POOL>
Migration of running system VMs will work same as earlier. The hostid parameter of the migrateSystemVM API can be used to specify the destination host while CloudStack will work out the suitable destination storage pool while migrating VM’s ROOT volume. A cloudmonkey API call for migrating a running system VM to a different host will look like this:
migrate systemvm virtualmachineid=<UUID_OF_SYSTEM_VM> hostid=<UUID_OF_DESTINATION_HOST>
- UI changes for system VM migration
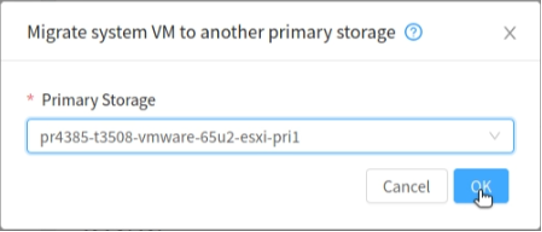
New actions have been added in different system VM views (SSVM, CPVM, VR and load balancer) to allow migration of stopped VMs:
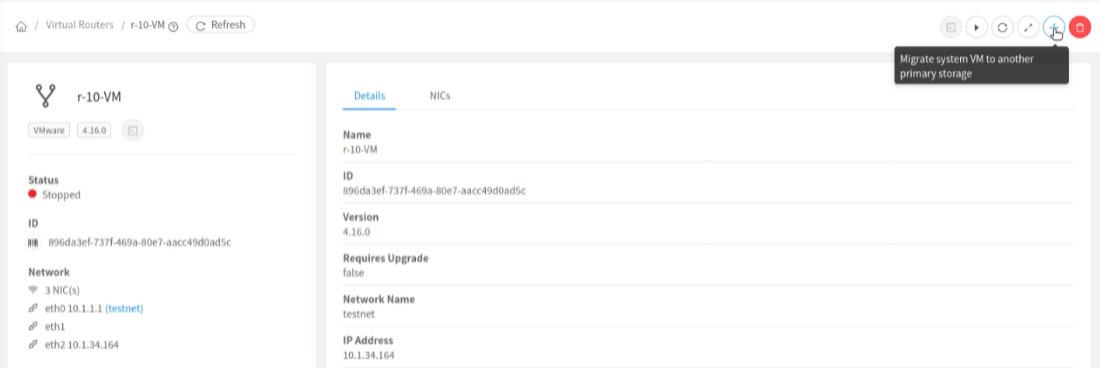
New UI form for migrating system VM to another primary storage:
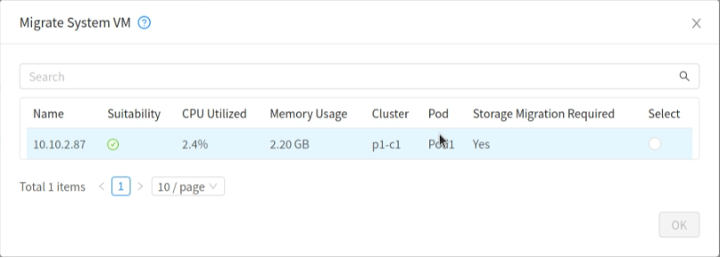
For running system VMs, UI will now show a form similar to user VM migration showing details of destination hosts:
To allow VM and volume inter-cluster migrations, the VMware vSphere setup / configuration prerequisites for vMotion and storage vMotion must be in place. Also, migration of a VM with a higher hardware version to an older ESXi host (that doesn’t support that VM hardware version) will fail (native VMware limitation). Therefore, a VM running on an ESXi 6.7 host with VM hardware version 14 will fail to migrate to an ESXi 6.5 host.
These changes will be part of the next CloudStack LTS release which is scheduled for Q3/4 2021.
Abhishek Kumar is a software engineer by profession. His personal interests and hobbies are technology, politics and sports. Abhishek is experienced in development and management of a variety of desktop and mobile applications. He has a particular interest in mobile application development, designing and developing highly interactive and intuitive mobile, desktop applications GUI.
Abhishek became part of ShapeBlue in 2019 and is currently an active Apache CloudStack Committer.
You can learn more about Abhishek and his background by reading his Meet The Team blog.
