The CloudStack API is a very powerful tool which once mastered provides Administrators access to all of CloudStack’s features, many of which are not available via the GUI.
During a number of recent Projects the ShapeBlue consulting team needed to leverage these features in order to deliver the advanced solutions our clients required.
This article will demonstrate completing the following tasks using only the API:
- Creating a new Network Offering with No DHCP and DNS Services
- Activating the Network Offering
- Creating an Isolated Network based on the new Network Offering
- Creating a Guest Instance with a pre-determined IP Address
For the sake of this blog article, a greatly simplified example infrastructure is used, however the concepts covered here have been used with large complex Clouds.

The simple example infrastructure consists of the following:
- CloudStack Server on IP 192.168.1.1 with API Port 8096 enabled
- Default Guest CIDR of 10.1.1.1/24
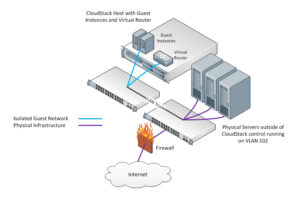
- A physical infrastructure separate to CloudStack with a CIDR of 192.168.250.0/24 using VLAN 102
- Active Directory, DHCP and DNS Servers
- A Client Specific Physical Firewall on IP 192.168.250.1
Advanced Networking Use Case Example
Imagine a Hosting Provider who is addition to offering Cloud Services based on CloudStack, has clients who also have dedicated servers running Active Directory, DNS, DHCP etc and a dedicated Hardware Firewall in their Data Centre. The client now wants to start using Guest Instances hosted on the CloudStack platform, but connected to the existing AD Domain on the dedicated physical infrastructure. Due to the integration with Active Directory the default Guest IP Address range and DNS Servers offered by the CloudStack Virtual Router will not be suitable as they are common to the whole Zone.
In order to create a CloudStack Network which utilises the required IP Address Range, and provides access to the DNS Servers within the Active Directory Domain, a new Isolated Network is required. Once created, this Isolated Network will be linked to the Physical Architecture via a VLAN Trunk.
The default CloudStack Network Offerings are not suitable for this as they all provide DNS and DHCP Services, so a new Network Service Offering will need to be created.
Using the API
Only some of the required steps can be completed via the GUI so the only way to configure and implement this architecture is by using the API.
For testing and evaluation, the API commands can be submitted manually by simply pasting them into a browsers Address Bar. A live deployment which requires this type of advanced management should create a set of custom management tools to streamline and automate these processes.
API commands are normally submitted with user specific security credentials, however Administrators with direct access to the CloudStack Server can use the API Port to simplify the commands.
Prior to the release of V3.0.1 this API Port was enabled by default and used port 8096. If you have upgraded from V3.0 it will still be enabled, clean installs of V3.0.1 and later will need to enable this in Global Settings. If enabled you should change the default setting to increase security.
Creating a Custom Network Offering
We need a new Network Offering with no DHCP or DNS so we can use the physical DHCP and DNS Servers, the base command for this is:
http://192.168.1.1:8096/client/api?command=createNetworkOffering
We then append the various options such as Name, Description etc
&name=Name
To use spaces in text in API commands, we need to use %20, so for the description we would use
&displaytext=Offering%20Description
As we want to use this Network Offering with a single account, we need to create an Isolated Network Offering
&guestiptype=Isolated
We do not really need any Supported Services so we will use the bare minimum of just UserData, but as it is simply a coma separated list multiple services can be added if required
&supportedservices=UserData
The Traffic Type in V3 of CloudStack must be Guest
&traffictype=guest
We want to change the default 200Mb Network speed to 1Gb
&networkrate=1000
We want to connect this network to a specific VLAN, so we need to be able to specify the VLAN ID when we create the Network using this Network Offering
&specifyvlan=true
We have to specify IP Ranges when creating an Isolated network, even though we will be using an external DHCP Server
&specifyipranges=true
The full command will therefore look like this:
http://192.168.1.1:8096/client/api?command=createNetworkOffering&name=Name&displaytext=Offering%20Description&guestiptype=Isolated&supportedservices=UserData&traffictype=guest&networkrate=1000&specifyvlan=true&specifyipranges=true
Once submitted, this will create a new Network Offering and provide an XML response in the browser with the results including the ID of the new offering, we must capture this ID for use in later steps.
Activating the newly created Network Offering
New Network Offerings created with the API are initially disabled, but using the ID recorded from the previous step we can activate it using the following command:
http://192.168.1.1:8096/client/api?command=updateNetworkOffering&id=XXXXX&state=Enabled
Create an Isolated Network
Only a ROOT level Administrator can create new Networks which use a specific VLAN ID. The command will need a number of IDs which will need to be obtained first using the following commands:
http://192.168.1.1:8096/client/api?command=listZones to obtain the Zone ID
http://192.168.1.1:8096/client/api?command=listDomainChildren to obtain the Domain ID
The base command to then create the new Network is:
http://192.168.1.1:8096/client/api?command=createNetwork
The options required for this example are:
&name= Network%20Name
&displaytext=Network%20Description
The Network Offering ID was obtained when we created the new Network Offering
&networkofferingid=XXX
&zoneid=XXX
An IP Range, Netmask & Gateway has to be specified
&startip=192.168.250.100
&endip=192.168.250.150
&gateway=192.168.250.1
&netmask=255.255.255.0
The VLAN of the existing physical architecture to enable Guest Traffic to be exchanged
&vlan=102
The ID of the Domain the Account belongs to
&domainid=XXX
The Name of the Account, and not the ID is used here, highlighting the importance that the method used for generating Account Names, creates truly unique ones.
&account=XXX
We want to restrict access to this Network to a specific Account
&acltype=Account
The final command will therefore look something like this:
http://192.168.1.1:8096/client/api?command=createNetwork&name=Network%20Name&displaytext=Network%20Description&networkofferingid=XXX&zoneid=XXX&startip=192.168.250.100&endip=192.168.250.150&gateway=192.168.250.1&netmask=255.255.255.0&vlan=102&domainid=XXX&account=XXX&acltype=Account
Deploy Guest Instance
The only way to deploy a new Guest Instance with a pre-determined IP Address is to do so via the API. As we will be connecting this Instance to an existing Active Directory Domain there will probably be an IP Schema already in place.
This IP address will not actually be assigned by CloudStack as we have created a Network Service Offering without DHCP, but as there will be an IP Address displayed in the GUI, we should allocate it to prevent confusion when using the CloudStack GUI. The IP Address will actually be assigned by the Physical DHCP Server, or configured manually within the Guest Instance.
Before we can deploy a new Guest Instance we need to obtain the IDs of the chosen Service Offering and Template
http://192.168.1.1:8096/client/api?command=listServiceOfferings
http://192.168.1.1:8096/client/api?command=listTemplates&templatefilter=featured
The base command to then create the Guest Instance is:
http://192.168.1.1:8096/client/api?command=deployVirtualMachine
The options required for this example are:
The Service Offering and Template IDs obtained by the previous commands
&serviceofferingid=XXX
&templateid=XXX
Zone, Domain and Account information used earlier
&zoneid=XXX
&domainid=XXX
&account=XXX
Unique Instance Display Name
&displayname=Instance%20Display%20Name
&ipaddress=192.168.250.110
Multiple Network IDs can be assigned, hence the ‘Pluralisation’ of this option
&networkids=XXX
The complete command will look like:
http://192.168.1.1:8096/client/api?command=deployVirtualMachine&serviceofferingid=XXX&templateid=XXX&displayname=Instance%20Display%20Name&ipaddress=192.168.250.110&networkids=XXX
The DeployVirtualMachine command is Asynchronous, to the feedback after issuing the command consists of only two IDs. To check the status of Asynchronous commands, take the Job ID from the results and use with the following command
command=queryAsyncJobResult&jobId=XXX
Once the Asynchronous command has completed, the results returned by the queryAsyncJohbResult command will be updated and provide a very detailed output.
Summary
This article has demonstrated some of the advanced features available to CloudStack Administrators, and introduced management using the API rather than the GUI. By employing these techniques, complex Cloud architectures can be created and managed.
To simplify this type of management, scripts written using Ajax should be used as these can interact with the XML responses issued by the CloudStack API allowing advanced workflows to be created.
About the Author
Geoff Higginbottom is CTO of ShapeBlue, the strategic cloud consultancy. Geoff spends most of his time designing private & public cloud infrastructures for telco’s, ISP’s and enterprises based on CloudStack.
Steve is ShapeBlue’s COO and is responsible for all day-to-day administrative and operational functions of the business, including the consulting, programme management, and support functions.
Involved with CloudStack since 2012, Steve has led several large customer engagements including a number of major public and private cloud deployments; co-ordinated and developed worldwide teams and helped implement and deliver an enterprise grade support product.
Prior to ShapeBlue, Steve held senior technical, project and account management roles in enterprise IT outsourcing companies where he gained domain experience in the finance, professional services and defence markets.
Away from work, Steve is a father, keen guitarist, snowboarder and singer (not necessarily in that order).
Away from work, Steve is a music lover and semi-professional musician. Although he doesn’t speak at many technology conferences, he can sometimes be heard providing the evening entertainment.


