Many applications require shared storage to efficiently manage data across multiple Instances. With the release of Apache CloudStack 4.20, the new Shared Filesystem feature provides a CloudStack-managed NFS solution, allowing multiple Instances within the same Account and Network to access a shared file system simultaneously.
This feature brings CloudStack closer to major cloud providers, such as AWS Elastic File System (EFS), by offering a simple and scalable way to provision NAS-based shared storage.
Key Use Cases
The CloudStack Shared Filesystem is particularly useful for:
- High-availability clusters – Allowing multiple Instances to access shared data in real time.
- Web and media servers – Storing and serving content efficiently across distributed applications.
- Containerized workloads – Enabling applications running in Kubernetes or other platforms to share persistent storage.
- CI/CD and data analytics pipelines – Centralizing build artifacts, logs, and analytical datasets for simultaneous access.
Unlike traditional block storage, the Shared Filesystem provides a fully managed NAS experience, simplifying storage management for workloads that require shared access. Cross-account sharing is not supported, reinforcing CloudStack’s security and account isolation model.
This article explores how the Shared Filesystem feature works, its key advantages, use cases, and how to deploy and manage it effectively within CloudStack 4.20.
What is a Shared Filesystem?
The Shared Filesystem feature in Apache CloudStack 4.20 provides a managed Network File System (NFS) solution, allowing multiple Instances within the same Account and Network to access a shared file system simultaneously. This feature enables Users to provision shared storage directly from the CloudStack UI or API, without needing external NAS appliances or manual configuration.
Once a Shared Filesystem is created, CloudStack provisions an NFS export of a specified size, which can be mounted by multiple Instances in the same Network. This makes it ideal for workloads that require persistent and shared data access.
The initial implementation of the Shared Filesystem feature in CloudStack 4.20 supports NFSv4 (Network File System version 4) with XFS or EXT4 file system formats. The provisioning process is fully automated, meaning CloudStack handles the deployment, management, and high availability of the Shared Filesystem Instance without requiring manual intervention.
Creating a New Shared Filesystem
Creating a Shared Filesystem in Apache CloudStack 4.20 is a straightforward process, allowing users to provision and configure CloudStack-managed NFS storage with just a few steps.
- In the left navigation bar, click on “Storage”.
- In the Select View dropdown, choose “Shared Filesystems”.
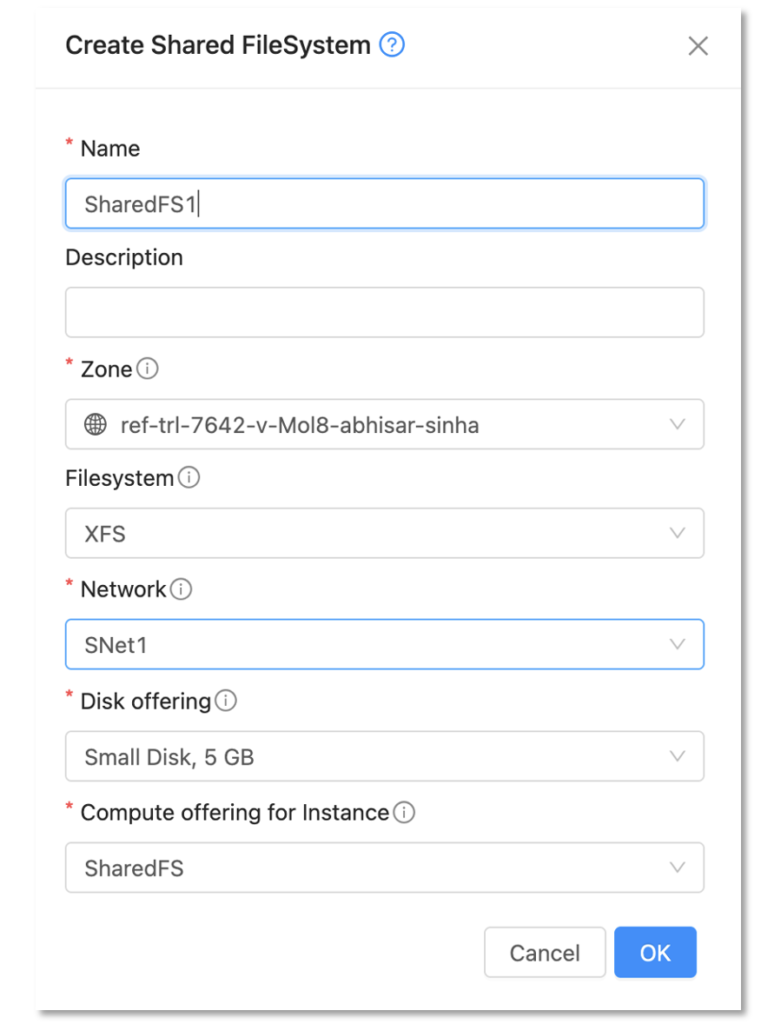
- Click on “Create Shared Filesystem”, provide the following details:
Name: A unique name for the Shared Filesystem.
Description: An optional description to help identify the purpose of the filesystem.
Zone: The CloudStack zone where the Shared Filesystem will be created.
Format: The file system format to be used (e.g., XFS or EXT4).
Network: The Network that will have access to the Shared Filesystem.
Compute Offering: The compute resources allocated to the Shared Filesystem Instance (must meet the minimum CPU/RAM requirements).
Disk Offering: The storage allocation for the Shared Filesystem, defining its size and performance characteristics.
Administrators have additional options to specify:
- The Account, Domain, and Project ownership of the Shared Filesystem.
- Customizing storage placement based on storage tags and placement algorithms.
Service Offering Requirements
To ensure stable performance and high availability, CloudStack enforces minimum compute resource requirements for the Shared Filesystem Instance. These requirements are controlled by the following global settings:
sharedfsvm.min.cpu.count
default value: 2
Defines the minimum number of virtual CPUs allocated to the Shared Filesystem Instance.
sharedfsvm.min.ram.size
default value: 1024
Specifies the minimum RAM required for the Instance. Only Service Offerings meeting these requirements and supporting HA are shown during creation.
Accessing the Shared Filesystem
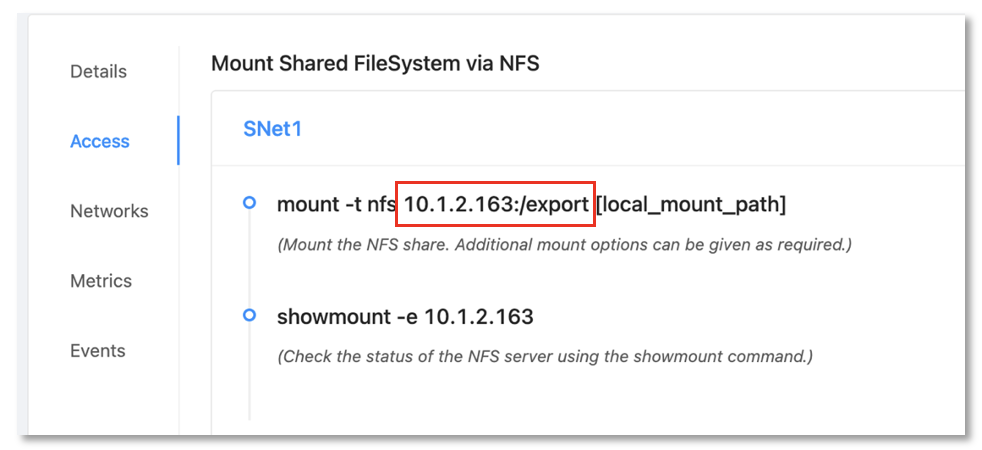
Once a Shared Filesystem is created, users can mount it on their Instances using the details provided in the Access Tab of the CloudStack UI. This tab displays the NFS export path and IP addresses required for mounting the filesystem.
Mounting the Shared Filesystem on an Instance
To access the Shared Filesystem, follow these steps:
1. Navigate to Storage → Shared Filesystems and select the desired filesystem.
2. Open the “Access Tab”, where you will find:
- NFS Server IP Address – The IP address of the Shared Filesystem Instance.
- Export Path – The NFS mount path for the filesystem.
3. Log in to your Instance via SSH or terminal.
4. Install the NFS client (if not already installed):
-
- For Debian/Ubuntu:
sudo apt update && sudo apt install nfs-common -y
- For Enterprise Linux distros:
sudo yum install nfs-utils -y
5. Mount the Shared Filesystem on your Instance:
sudo mount -t nfs <NFS_SERVER_IP>:<EXPORT_PATH> <MOUNT_POINT>
6. Example:
sudo mount -t nfs 10.1.2.163:/export /mnt
7. Verify the mount by running:
df -h | grep ‘/mnt’
8. Optionally, add the mount to /etc/fstab for automatic mounting on reboot:
echo “10.1.2.163:/export /mnt nfs defaults 0 0” | sudo tee -a /etc/fstab
How CloudStack Manages Shared Filesystems
When a Shared Filesystem is created in CloudStack, the system automatically provisions a Shared Filesystem Instance, which acts as an NFS server for managing and exposing the shared storage. This instance is stateless and HA-enabled, ensuring seamless failover in case of failure.
- If the Host or Shared Filesystem Instance goes down, CloudStack automatically deploys a new Instance, reattaching the existing data volume and reconfiguring the NFS export.
- These Instances are based on the SystemVM Template and are visible in the Instances Tab, with names prefixed as sharedfs-<filesystem-name>.
This design ensures high availability while keeping the data volume persistent, allowing CloudStack to quickly restore NFS services without data loss.
Step-by-Step Workflow
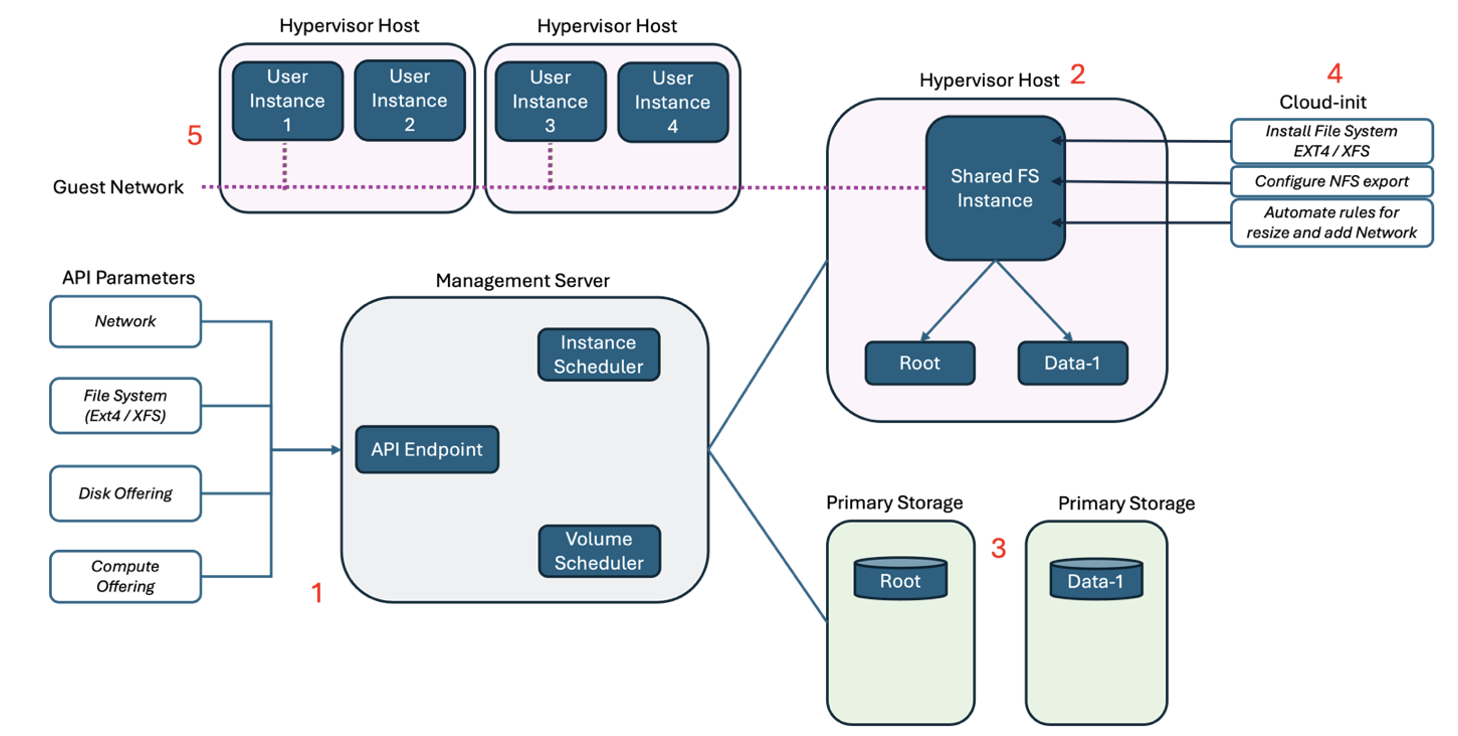
- User Request & API Call
- The user submits a request to create a Shared Filesystem via the CloudStack UI or API.
- The API call includes key parameters such as:
- networkid – The Network where the filesystem will be accessible.
- filesystem – The file system type (XFS or EXT4).
- diskofferingid – Defines the storage size and performance characteristics.
- serviceofferingid – Determines the compute resources allocated to the Shared Filesystem Instance.
- zoneid – Specifies the Zone where the Shared Filesystem Instance will be deployed.
- The API Endpoint processes the request and forwards it to the CloudStack Instance Scheduler and Volume Scheduler.
- For a complete list of supported API parameters, refer to: CloudStack API Docs – createSharedFileSystem
- Shared FS Instance Deployment
- The Instance Scheduler selects a Host to deploy the Shared Filesystem Instance (a specialized VM acting as an NFS server).
- The Instance is created from the SystemVM Template and appears in the Instances Tab, prefixed as sharedfs-<filesystem-name>.
- Volume Creation & Storage Allocation
The Volume Scheduler provisions two storage volumes on Primary Storage:
- Root Volume – Contains the operating system and CloudStack services required to manage the Shared Filesystem.
- Data Volume – The actual NFS share that will be exposed to Instances.
- Cloud-Init & NFS Configuration
Once the instance is deployed, Cloud-Init automates the configuration:
- Installs the selected filesystem (XFS/EXT4) on the data volume.
- Configures NFS exports to allow access only to Instances in the same Network.
- Automates operations such as resizing, adding Networks, and setting up firewall rules for security.
- Network Access & Mounting
- Once the Shared FS Instance is fully configured, it is attached to the specified Network.
- User Instances in the same Network can mount the Shared Filesystem using the NFS export path provided in the “Access Tab”.
- Cross-network or cross-account access is not allowed for security reasons.
Lifecycle Operations
CloudStack provides a range of lifecycle operations for Shared Filesystems, allowing users to manage and modify them as needed. These operations can be performed via the CloudStack UI or API.
- Update Name and Description: Modify metadata for clarity.
- Stop/Start: Temporarily disable or enable the Shared Filesystem Instance.
- Restart: Reboot the instance with optional cleanup, restoring it to the original Template without affecting data.
- Change Disk Offering: Upgrade the disk offering for increased storage size or performance, depending on the hypervisor’s capabilities.
- Change Service Offering: Modify the compute resources allocated to the Shared Filesystem Instance (available only when the Instance is stopped).
- Add/Remove Network: Attach or detach Networks, allowing Instances across Networks to access the NFS share.
- Destroy: Delete the Shared Filesystem Instance, with an option to recover before permanent expunge.
Backup and Recovery
- A Shared Filesystem Instance can be assigned to a Backup Offering, allowing scheduled or manual backups.
- Users can restore the filesystem to a previous backup, recovering stored data.
Backup Considerations
- Backup support depends on the storage solution used (e.g., Veeam, Dell Networker, NAS-based solutions).
- Backup policies must be configured at the zone level for automation.
Volume Snapshots
- Users can take snapshots of the Shared Filesystem’s data volume, enabling point-in-time recovery.
- Snapshots can be scheduled or taken manually.
- Restoration: A snapshot can be restored to revert the filesystem to a previous state.
Conclusion
CloudStack 4.20’s Shared FileSystems feature is a significant advancement in cloud storage capabilities, addressing the needs of collaborative, high-performance, and distributed applications. By integrating NFS-based shared storage, CloudStack now provides a comprehensive solution for workloads requiring shared access while maintaining the simplicity and flexibility that the platform is known for.
Abhisar is a Software Developer at ShapeBlue and has over 12 experience in the industry. In his personal time, Abhisar likes spending time with his wife and 2-year-old daughter. He also likes listening to and playing music. You can learn more about Abhisar by reading his Meet the Team blog.