Apache CloudStack is generally considered secure out of the box, however it does have the capability of protecting both system VM traffic as well as management traffic with TLS certificates. Prior to version 4.11 CloudStack used Tomcat as the web server and servlet container. With 4.11 this has been changed to embedded Jetty web server and servlet container that makes CloudStack more secure and independent of distribution provided Tomcat version which could be prone to security issues. This changes the management server’s TLS configuration.
In this blog post we’ll go through how to implement native TLS to protect both the system VMs – CPVM and SSVM – as well as the management server with public TLS certificates.
Please note since SSL is now being deprecated we now refer to the replacement – TLS – throughout this post.
Overview
The TLS configuration in CloudStack provides different functionality depending on the system role:
- TLS protecting the management server is a Jetty configuration which protects the main web GUI and API endpoint only. The configuration of this is handled in the underlying embedded Jetty configuration files.
- System VMs:
- The Console Proxy VM TLS configuration provides secure HTTPS connection between the main console screen (your browser) and the CPVM itself.
- The Secondary Storage VM SSL configuration provides a secure HTTPS connection for uploads and downloads of templates / ISOs / volumes to secondary storage as well as between zones.
- System VM SSL configuration is carried out through global settings as well as the CloudStack GUI.
System VM HTTPS configuration
Global settings
The following global settings are required configured to allow system VM TLS configuration:
| GLOBAL SETTING | VALUE |
|---|---|
| consoleproxy.url.domain | domain used for CPVM (see below) |
| consoleproxy.sslEnabled | Switches SSL configuration of the CPVM on / off Values true | false |
| secstorage.ssl.cert.domain | domain used for SSVM (see below) |
| secstorage.encrypt.copy | Switches SSL configuration of the SSVM on / off Values true | false |
The URL configurations can take three formats – and these also determine what kind of TLS certificate is required.
- Blank: if left blank / unconfigured the URLs used for CPVM and SSVM will simply be passed as the actual public IP addresses of the system VMs.
- Static URL: e.g. console.mydomain.com or ssvm.mydomain.com. In these cases CloudStack rely on external URL load balancing / redirection and/or DNS resolution of the URL to the IP address of the CPVM or SSVM. This can be achieved in a number of different ways through load balancing appliances or scripted DNS updates.
This configuration relies on:- The same URL used for both CPVM and SSVM, or
- a multi-domain certificate provided to cover both URLs if different ones are used for CPVM and SSVM.
- Dynamic URL: e.g. *.mydomain.com. In this case CloudStack will redirect the connections to the CPVM / SSVM to the URL “a-b-c-d.mydomain.com” where a/b/c/d represent the IP address, i.e. a real world URL would be 192-168-34-145.mydomain.com.
This relies on two things:- DNS name resolution configured for the full public system VM IP range, such that all combinations of “a-b-c-d.mydomain.com” can be resolved. Please note in CloudStack version 4.11 the public IP range used purely by system VMs can be limited by reserving a subrange of public IP addresses just for system use.
- An TLS wildcard certificate covering the full “mydomain.com” domain name.
Configuration process – GUI
The first step is to configure the four global settings above, then restart the CloudStack management service to make these settings live.
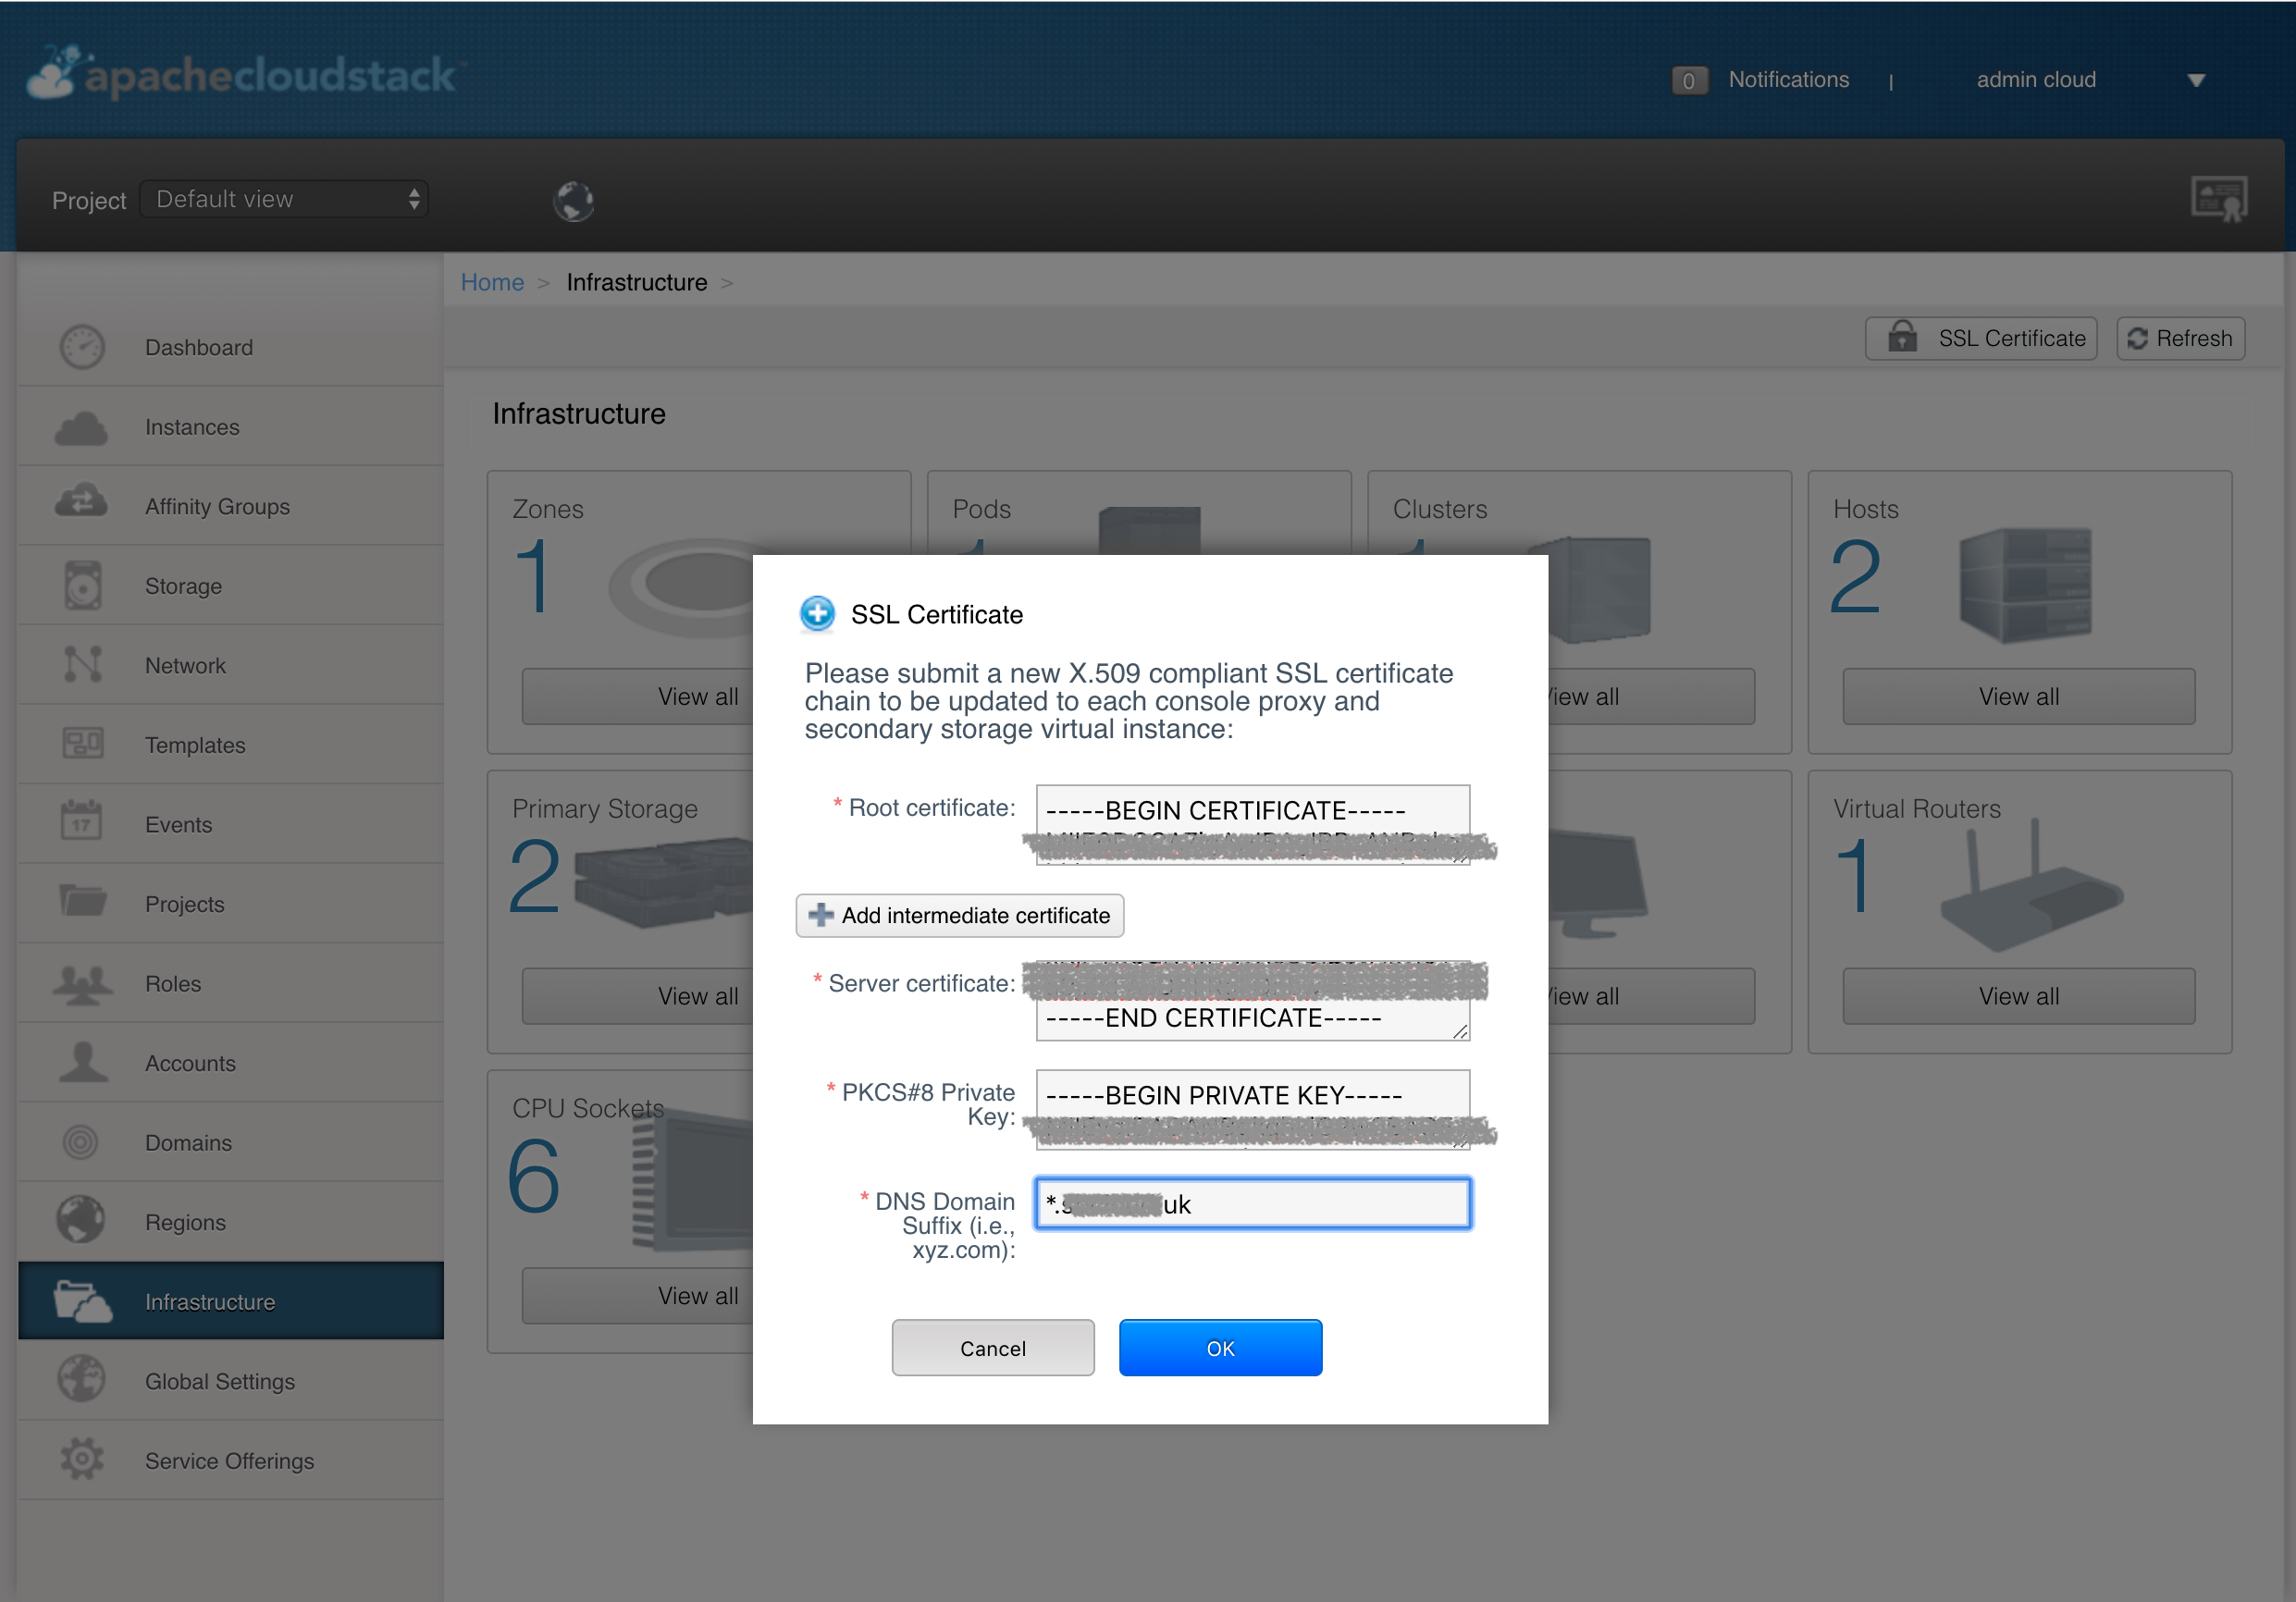
Next upload the TLS root certificate chain, the actual TLS certificate as well as the PKCS8 formatted private key using the “TLS certificate” button in the zone configuration. In this example we use a wildcard certificate.
Configuration process – API / CloudMonkey
The uploadCustomCertificate API call can be used to upload the TLS certificates. Please note the upload process does require at least two API calls – more depending on how many intermediary certificates are used. If you use CloudMonkey the certificates can be uploaded in cleartext – otherwise they have to be URLencoded when passed as part of a normal HTTP GET API call.
- In the first API call the combined root and intermediary certificates are uploaded. In this API call the following parameters are passed – note we don’t pass the private key:
- id=1
- name: Give the certificate a name.
- certificate: the root / intermediary certificate in cleartext, with all formatting / line breaks in place. In the example below we pass a chain of root and intermediary certificates.
- domainsuffix: provide the suffix used, e.g. *.mydomain.com.
- The second API call in our example uploads the site certificate. In this case we do not give the certificate a name (CloudStack automatically names this):
- id=2
- certificate: the issued site certificate, again in cleartext.
- privatekey: the private key, same cleartext format as certificate.
- domainsuffix: as above.
cloudmonkey upload customcertificate id=1 name=RootCertificate certificate='-----BEGIN CERTIFICATE-----
MIIE0DCCsdf8HqjeIHgkqhkiG9w0BAQsFADCBgzELMAk
...8V3Idv7kaWKK3245lsoynJuh87/BKONvPi8BDAB
-----END CERTIFICATE-----
-----BEGIN CERTIFICATE-----
MIIEfTCCA2WgAwIBAgIDG+cVMA8djwj1ldggKd9d9s
.....mw4TRfZHcYQFHfjDCmrw==
-----END CERTIFICATE-----
-----BEGIN CERTIFICATE-----
MIIEADCCAuigAwIBAgIBADANBgkqhkiG9w0BAQUFA
.....csbkqWletNw+vHX/bvZ8=
-----END CERTIFICATE-----'
domainsuffix='*.mydomain.com'

cloudmonkey upload customcertificate id=2 certificate='-----BEGIN CERTIFICATE-----
MIIGrjCCBZagAwIBAgIJAJ....
...xKjPTkOLfwMVWXc8Ul25t7lkyi0+a9jZxFAuDXFRgkQnbw==
-----END CERTIFICATE-----'
privatekey='-----BEGIN PRIVATE KEY-----
MIIEvEbidvik1gkqhkiG9w0BAQEFAASCBK
.....rEF5Qyuyserre87d234jj/Uddf
-----END PRIVATE KEY-----'
domainsuffix='*.mydomain.com'
System VM restart
Once uploaded the CPVM and SSVM will automatically restart to pick up the new certificates. If the system VMs do not restart cleanly they can be destroyed and will come back online with the TLS configuration in place.

Testing the TLS protected system VMs
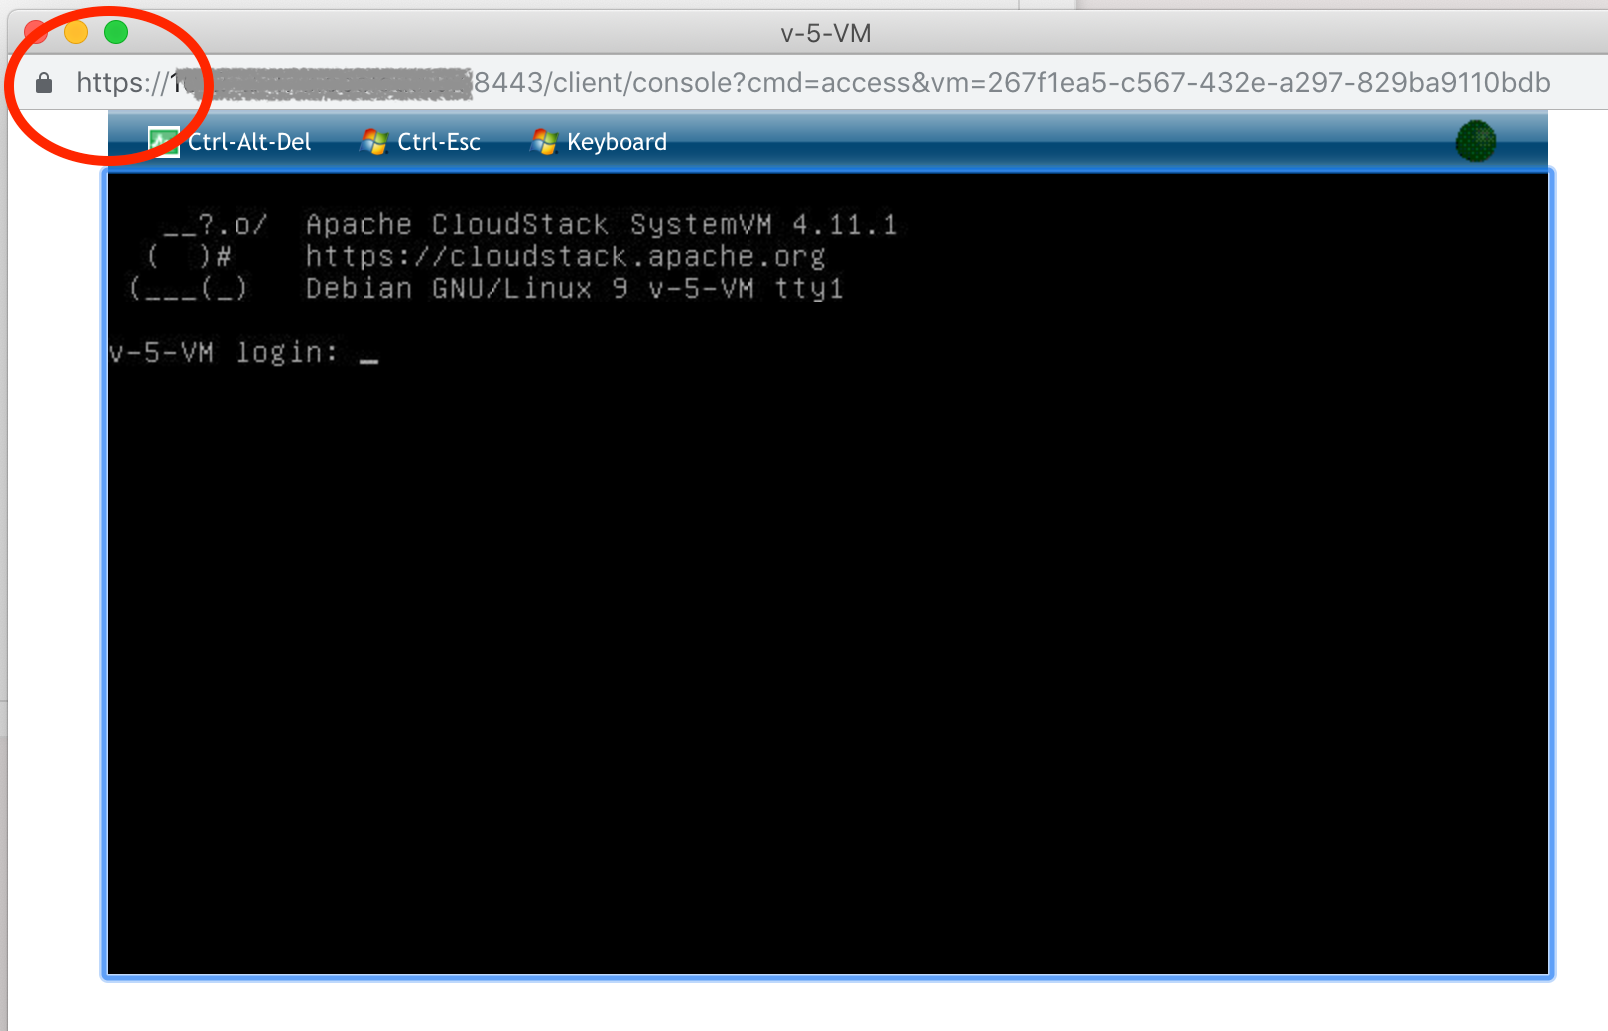
To test the Console Proxy VM simply open the console to any user VM or system VM. The popup browser window will at this point show up as a non-secure website. The reason for this is the actual console session is provided in an inline frame – and the popup page itself is presented from the unsecured management servers. If you however look at the page source for the page the HTTPS link which presents the inline frame shows up in the expected format:
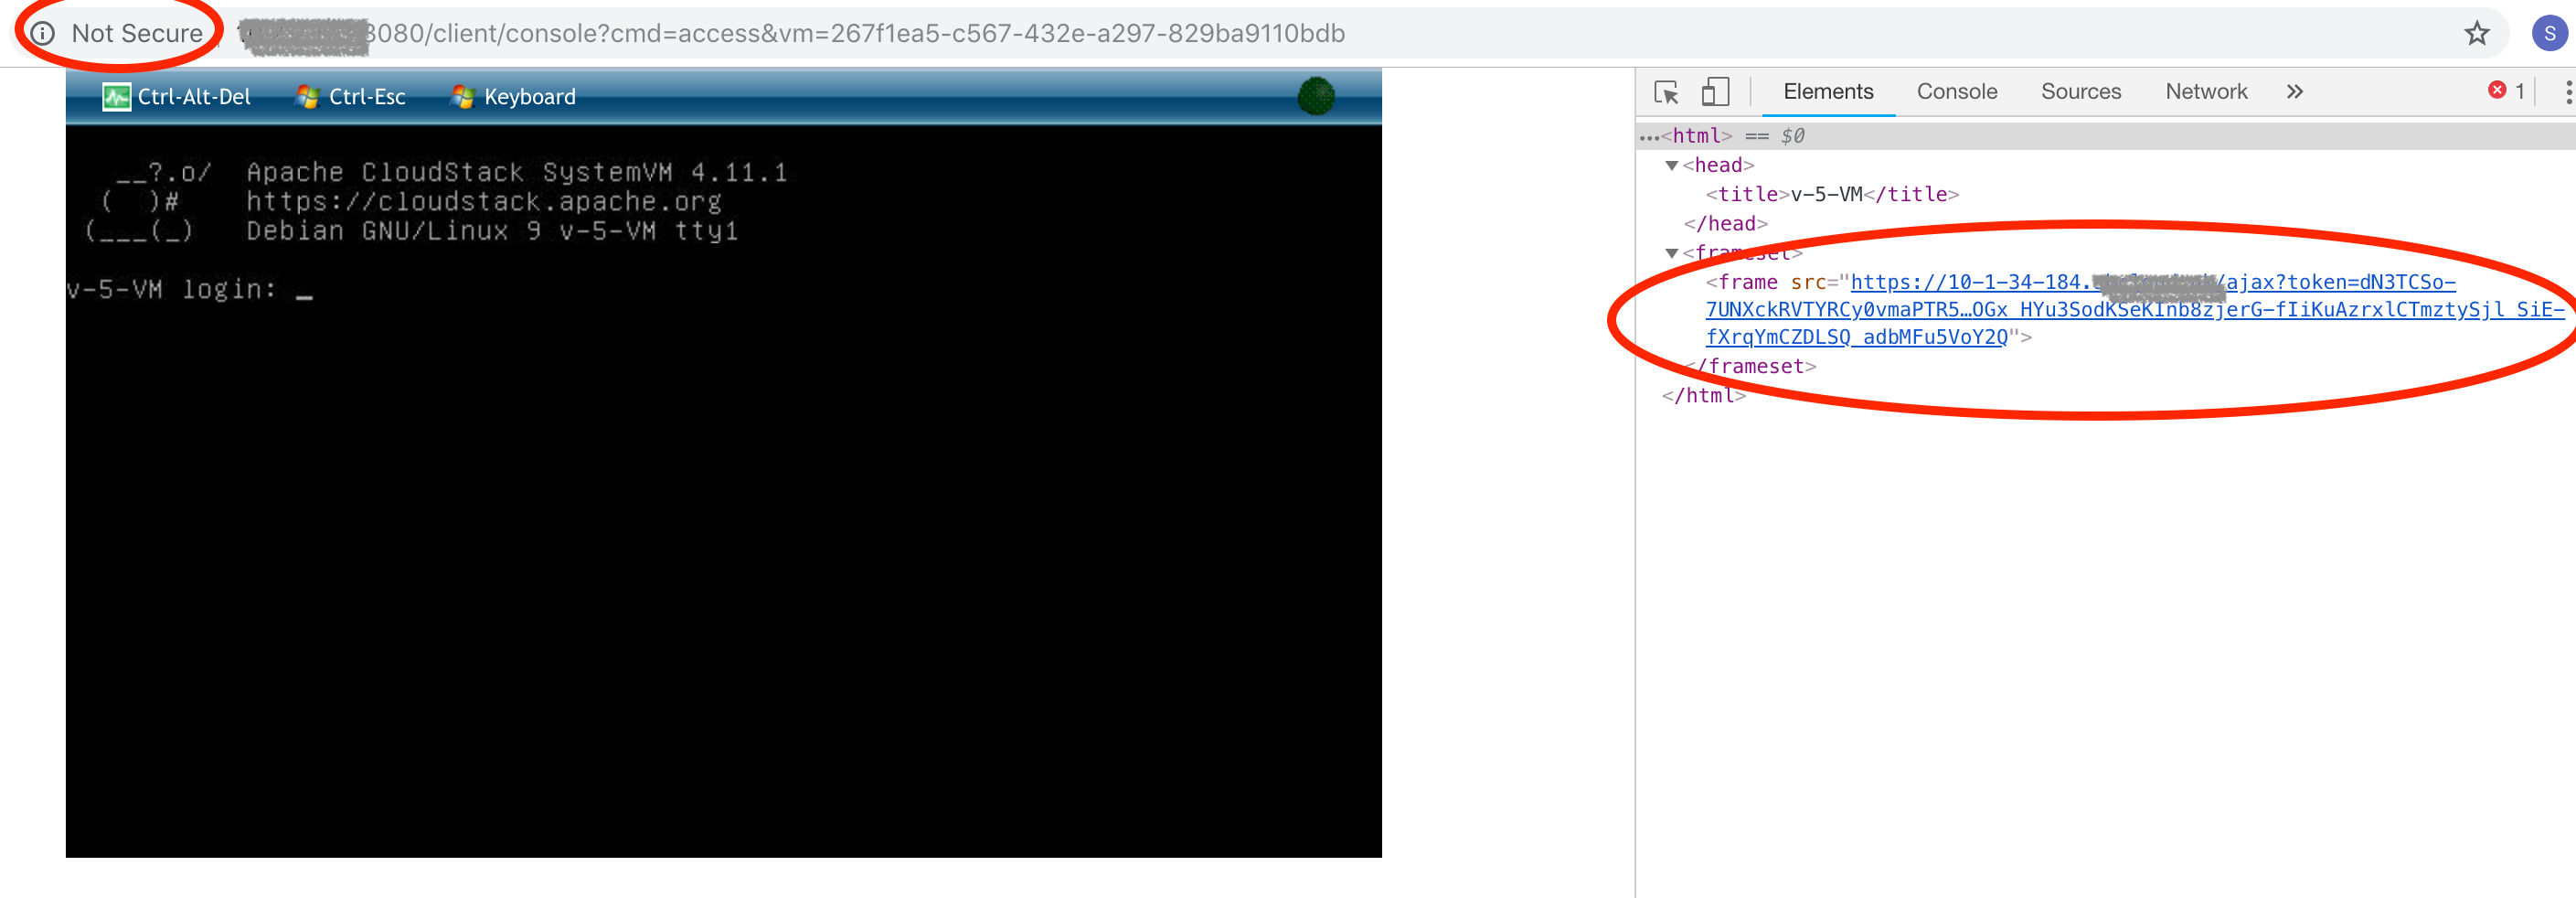
Once the management server is also TLS protected the CPVM console popup window will also show as secured:
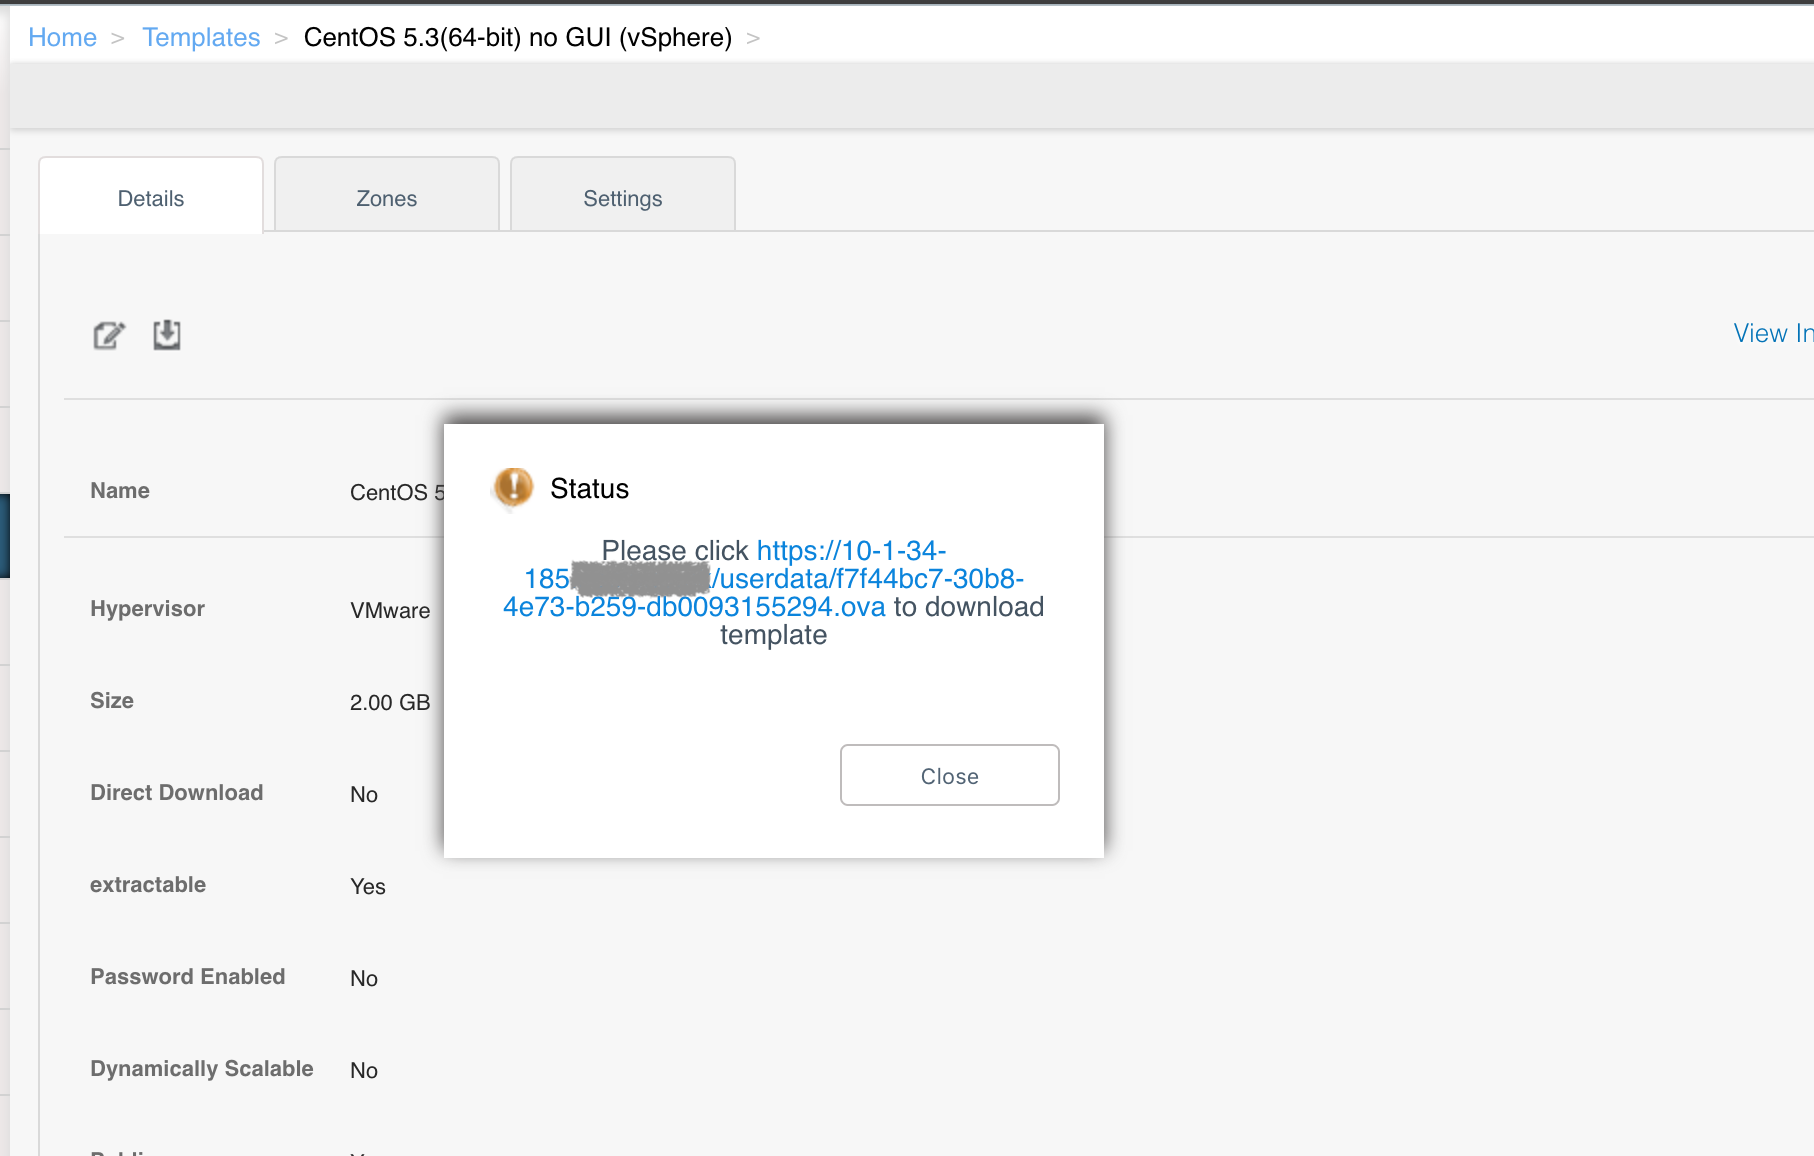
The SSVM will also now utilise the HTTPS links for all browser based uploads as well as downloads from secondary storage:
Securing the CloudStack management server GUI with HTTPS
Protecting the management servers requires creating a PCKS12 certificate and updating the underlying Jetty configuration to take this into account. This is described in http://wiki.eclipse.org/Jetty/Howto/Configure_SSL#Configuring_Jetty
First of all combine the TLS private key file, certificate and root certificate chain into one file (in the specified order), then convert this into PKCS12 format and write it to a new CloudStack keystore. Enter a new keystore password when prompted:
# cat myprivatekey.key mycertificate.crt gd_bundle-g2-g1.crt > mycombinedcert.crt

# openssl pkcs12 -in mycombinedcert.crt -export -out mycombinedcert.pkcs12
Enter Export Password: ************
Verifying - Enter Export Password:************

# keytool -importkeystore -srckeystore mycombinedcert.pkcs12 -srcstoretype PKCS12 -destkeystore /etc/cloudstack/management/keystore.pkcs12 -deststoretype pkcs12
Importing keystore mycombinedcert.pkcs12 to /etc/cloudstack/management/keystore.pkcs12...
Enter destination keystore password:************
Re-enter new password:************
Enter source keystore password:************
Entry for alias 1 successfully imported.
Import command completed:  1 entries successfully imported, 0 entries failed or cancelled
Next edit /etc/cloudstack/management/server.properties and update the following:
https.enable=true
https.keystore=/etc/cloudstack/management/keystore.pkcs12
https.keystore.password=<enter the same password as used for conversion>
In addition, automatic redirect from HTTP/port 8080 to HTTPS/port 8443 can also be configured in /usr/share/cloudstack-management/webapp/WEB-INF/web.xml. Add the following section before the section around line 22:
<security-constraint>
<web-resource-collection>
  <web-resource-name>Everything</web-resource-name>
  <url-pattern>/*</url-pattern>
</web-resource-collection>
<user-data-constraint>
  <transport-guarantee>CONFIDENTIAL</transport-guarantee>
</user-data-constraint>
</security-constraint>
Lastly restart the management service:
# systemctl restart cloudstack-management
Conclusion
The TLS capabilities of CloudStack has been extended over the last few releases – and we hope this article helps to explain the new global settings and configuration procedure.
About The Author
Dag Sonstebo is a Cloud Architect at ShapeBlue, The Cloud Specialists. Dag spends most of his time designing, implementing and automating IaaS solutions based on Apache CloudStack.
Giles is CEO and founder of ShapeBlue and is responsible for overall company strategy, strategic relationships, finance and sales.
He is also a committer and PMC member of the Apache CloudStack project and Chairman of the European Cloudstack User Group, actively helping promote brand awareness of the technology.
Giles can regularly be heard speaking at events around the globe, delivering visionary talks on cloud computing adoption and more specifically on Cloudstack technologies.
Before ShapeBlue, Giles held C-Level technology positions for 15 years including founder and CEO of Octavia Information Systems, a leading UK Managed Service Provider.
Giles holds a BSc in Engineering Physics from Sheffield Hallam University. Outside work, Giles is married with two teenage children. He coaches children’s rugby, is a competitive masters swimmer and can regularly be seen crying when his beloved Tottenham Hotspur lose.
