Layer 2 (also known as the Data Link Layer) is the second in the seven-layer OSI reference model for network protocol design, and is equivalent to the link layer (the lowest layer) in the TCP/IP network model. Layer 2 is the network layer used to transfer data between adjacent network nodes in a wide area network, or between nodes on the same local area network.
We have recently introduced a new Layer 2 network offering in CloudStack. This enables all network services to be provided from network equipment external to CloudStack. As a result, the Virtual Router is not required, and VMs deployed to the network will get their IP addresses and other network services from these external appliances. This new network type is acting like a shared network, but it leaves all network services to be managed outside of CloudStack.
This article describes how to set up a Layer 2 network in the upcoming 4.11 CloudStack release.
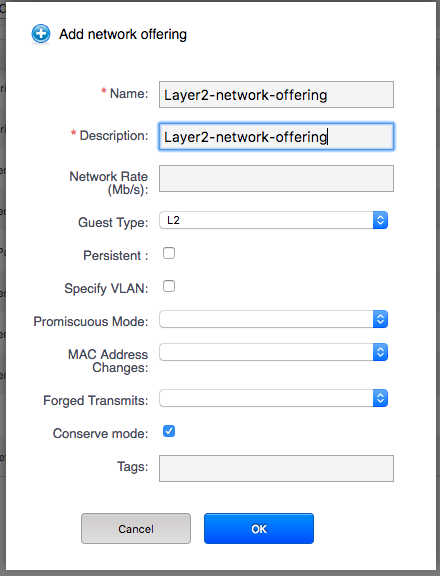
The network offering
Following CloudStack’s architecture, there must first be a specific network offering enabled in order to deploy a L2 network. Such an offering can be created by selecting ‘Guest Type: L2’ (it also supports the ability to specify VLAN). When selected, the user will need to specify a VLAN id when creating the network, and the network will be implemented using a dynamically assigned VLAN. Otherwise, the administrator will have to manage this externally from CloudStack, by appliance or other VM. Once created, the network offering needs to be enabled in order to implement the L2 network.

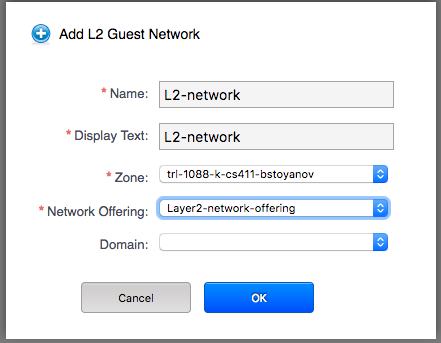
The network
CloudStack Administrators are able to create Layer 2 networks simply by clicking ‘Network’, where a new button is introduced: ‘Add L2 Guest Network’. By clicking this button, a CloudStack administrator will have the ability to fill in the network specifics to implement it. Please note, that where the network offering requires a VLAN, CloudStack administrators must specify a particular VLAN id. When all details are complete the network can be saved by clicking ‘OK’. At this stage our Layer 2 network is ready to use and we can start deploying VMs in it.
Add network button:

Add network pop-up:

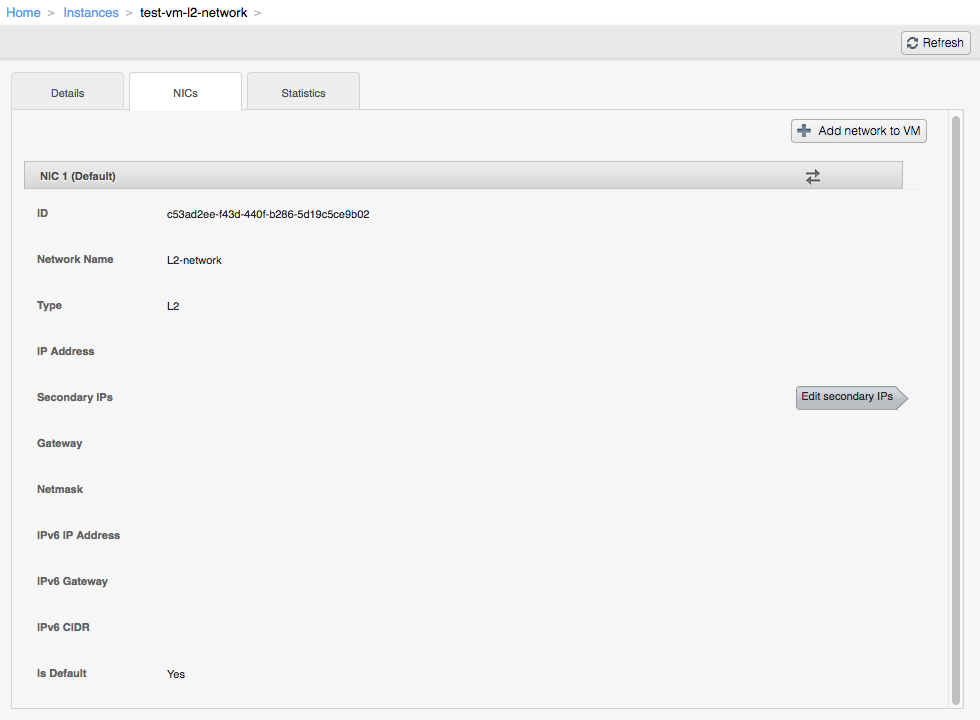
How it looks
As soon as we get our VMs into ‘Running’ state, we can see on the NICs section that there are no network details available (such as IP Address, gateway, etc.), but the VM is reachable and available through the Console Proxy VM. Since we don’t have any of these services, our network is running without a Virtual Router, which makes the deployment fast.

On the physical network side, the cloud administrators needs to setup all the resources managing the network services, since they are now external to CloudStack. They need to setup routers/switches, DHCP, additional load balancers and etc. Please note that once setup, all services are managed externally, and therefore CloudStack cannot handle IP assignments, port forwarding or other networking services that the Virtual Router normally does. Layer 2 type networks can only be managed by cloud administrators.
About the author
Boris Stoyanov is Software Engineer in testing at ShapeBlue, The Cloud Specialists. Bobby spends his time testing features for the Apache CloudStack Community and for our ShapeBlue clients.
Boris is a QA Engineer who found his ikigai in Apache CloudStack. Since 2016, he has been involved in testing CloudStack working for ShapeBlue. Boris is also usually driving forward a lot of community initiatives like the GSoC. In his free time, he enjoys hiking, boxing and other sports. Boris is a father of two young girls and spends most of his time on family activities.


