Traditionally, Network Functions (NF) were provided by dedicated hardware appliances, such as routers, firewalls, and load balancers. This hardware could be expensive, inflexible, and difficult to manage. However, in recent years, there has been a shift towards Virtual Network Functions (VNFs), which are software-based network functions that can be deployed on virtualised infrastructure.
The VNF Appliance Integration Feature is part of CloudStack 4.19 and simplifies the process of provisioning, deploying, and managing VNF Appliances, making it easier for organizations to take advantage of the scalability and flexibility that VNFs offer.
Feature Description
Apache CloudStack includes a built-in resource known as a Virtual Router (VR) to deliver network services such as firewall, port redirect, load balancer, internal DNS, DHCP server, User VPN, site-to-site VPN, private gateway, userdata, SNAT and DNAT. The VR has been a part of CloudStack since its inception and is extensively utilized as the sole option for deploying various types of networks, including Shared, Isolated, and VPC Networks.
However, using VRs comes with certain limitations. There are no Command Line Interface (CLI) tools, no Web User Interface (UI), and no Application Programming Interface (API) available for managing the VRs. Additionally, VRs lack support for some services that users may require, such as OpenVPN and Dynamic Routing.
With the release of Apache CloudStack 4.19, new features such as VNF (Virtual Network Function) Templates and VNF Appliances have been introduced. These allow Users to create VNF appliances and deploy them into Guest Networks as an alternative to using CloudStack’s Virtual Routers (VRs). This provides a way to deliver network services to the Instances within those Networks.
Introducing VNF Templates and VNF Appliances
VNF Appliances are similar to traditional CloudStack Instances and require a Template for deployment. There is a new VNF Template type called ‘VNF’, which has unique characteristics not found in standard Templates. These characteristics include the ability to specify the network NICs that need to be connected to the corresponding CloudStack Guest Networks during deployment, as well as storing access details and other information about the device.
VNFs, or Virtualized Network Functions, are software applications that perform network functions. They operate as virtual machine instances across different hypervisors, serving to replace physical network devices and thereby reduce costs associated with physical appliances.
The network services provided by VNF Appliances include, but are not limited to:
• Gateway (Storage, VOIP, etc)
• NAT (SNAT, DNAT)
• Firewall
• Load balancing
• DHCP/DNS
• VPN
• Tunneling (VXLAN, NVGRE, MPLSoUDP, etc)
• Security (IDS, IPS)
• WAN Acceleration/Optimization
• Transparent proxy
The VNF Appliance Feature introduces two new components:
VNF Template
This is the image that includes the pre-configured network services. CloudStack allows for CRUD operations (create, list, update, delete) on VNF Templates. Additionally, users have the ability to configure VNF NICs (Network Interface Controllers) and the details of VNF Templates.
VNF Appliance
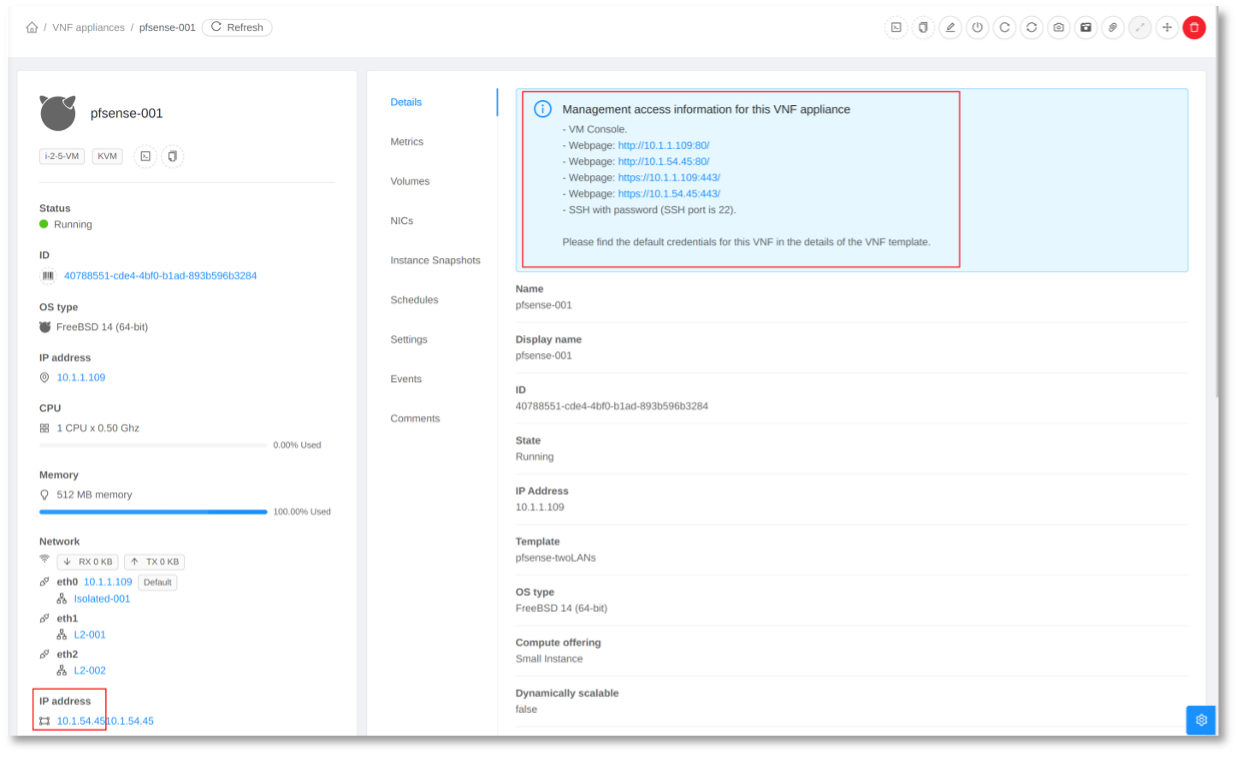
This is a virtual machine instance that provides network services. CloudStack allows for CRUD operations (create, list, update, delete) on VNF appliances. Utilizing the information from the VNF template, CloudStack automatically configures network rules for the management interfaces of these appliances. Information about access is displayed on the UI.
How to Build Your Own VNF Template
There are many VNF images available publicly, but it’s important to note that most VNF images are not free and may require licenses to use. In this section, we’ll guide you through the process of creating a VNF template using a pfSense ISO. This approach allows you to build a customized VNF template tailored to your specific network service needs, leveraging the capabilities of pfSense®, a popular open-source firewall and router platform.
pfSense software is a free, open-source customized distribution of FreeBSD specifically tailored for use as a firewall and router that is entirely managed via the web interface. In addition to being a powerful, flexible firewalling and routing platform, it includes a long list of related features and a package system allowing further expandability without adding bloat and potential security vulnerabilities to the base distribution. Ref: https://www.pfsense.org/about-pfsense/
To build a VNF Template, we need to create an Instance from the ISO and make some configurations:
1. Register the ISO image: The pfSense ISO can be found on pfSense website. Ref: https://www.pfsense.org/download/

For this tutorial, we will define the following Network architecture:

The Instance is deployed across 3 networks:
• An isolated network serves as the default network, which will act as both the public and management interface.
• Two additional L2 networks, act as the guest networks for the Instances behind the VNF Appliance.
2. With all Networks in place, start the “Add Instance” wizard, select the Networks and the pfSense ISO image:

• Once started, configure the pfSense services using the console terminal and log in using the default username and password (admin/pfsense).
The configuration process includes, but is not limited to, the following steps:
• Enable Static NAT or creating port forwarding for the HTTPS port (443) in CloudStack to the Instance.
• Add firewall rules to allow access to the HTTPS port (443).
• By default, HTTPS access is restricted to the private network. It’s necessary to modify the pfSense settings to allow traffic from the other Networks.
| cat > /etc/pf.conf <<EOF
pass out all keep state pass in all EOF
pfctl -f /etc/pf.conf |
• Now, open a browser and navigate to “https://<PublicIP>” to access the pfSense web interface and to continue with the configuration.
If you encounter this error:
“An HTTP_REFERER was detected other than what is defined in System -> Advanced (https://<PublicIP>/). If not needed, this check can be disabled in System -> Advanced -> Admin.”
Please run the following command in the pfSense console:
| pfSsh.php playback disablereferercheck |
You also have the option to disable the HTTP referer check. To do this, navigate to System -> Advanced -> Admin Access -> webConfigurator in the pfSense interface, and then check the box for “Disable HTTP Referer Check.”

3. Assigning Interface Traffic
This step involves configuring the network interfaces within pfSense to manage traffic flow correctly. You’ll need to specify which interfaces are designated for WAN, LAN, and optionally additional LANs. This setup is crucial for ensuring that your network services are delivered efficiently and securely through the appropriate channels.

• WAN interface
The WAN interface should be set up to obtain a DHCP IP address from CloudStack’s virtual routers. This configuration ensures that the WAN interface can dynamically receive an IP address, allowing it to connect to external networks and the internet through the CloudStack infrastructure.

After configuring the WAN interface, to enable HTTPS access, please navigate to Interfaces -> WAN -> General Configuration. Here, you should uncheck the option “Block private networks and loopback addresses.” This action will add a firewall rule allowing HTTPS traffic, facilitating secure web access to your services.

Then, proceed to Firewall -> Rules -> WAN and add a new rule. For the Destination, set the Destination Port Range to HTTPS. This will create a firewall rule specifically allowing HTTPS traffic through the WAN interface, ensuring secure web access is permitted.

• LAN interfaces
The LAN interfaces (LAN and LAN2), should be configured to use static IPv4 addresses. For instance, you can assign the IP address 192.168.1.1 to the interface labeled “LAN” and the IP address 192.168.2.1 to the interface labeled “LAN2”. This configuration ensures that each LAN interface has a fixed, predictable IP address for network management and connectivity purposes.

Additionally, for both LAN interfaces (LAN and LAN2), make sure to uncheck the options “Block private networks and loopback addresses” and “Block bogon networks”. This adjustment will ensure that traffic from private and bogon networks is not automatically blocked by the firewall, allowing for necessary internal communication and network management tasks.

The DHCP server needs to be configured on both LAN interfaces. For example on the interface “LAN”, the DHCP server is enabled (go to Services -> DHCP server -> LAN) and DHCP IP range is configured as 192.168.1.100-192.168.1.199, as shown below.

Specifically for the “LAN2” interface, you should also configure the DHCP server, making sure to set the DHCP IP range to 192.168.2.100-192.168.2.199. This action ensures that devices connected to the LAN2 network are automatically assigned IP addresses within this specified range, facilitating seamless network management and connectivity for the second LAN segment.
Registering a Template
To create a VNF Template, follow these steps:
• Stop the pfSense Instance, navigate to Volumes, select the root Volume, click on “Download Volume” and confirm.

• Copy the URL to proceed with creating a new template based on the root Volume:

• Register a Template
In Apache CloudStack, when registering a new Template, there is now an option to specify the Template Type. To register a VNF Template, you can select “VNF” as the template type. This feature allows for the categorization and easy identification of Templates designed specifically for VNF, streamlining the deployment process for network services within CloudStack environments.

• VNF Template Settings
In Apache CloudStack, a new tab is introduced on the Template page, which allows for the configuration of the VNF Template. This dedicated tab provides a centralized location for setting up and customizing the VNF Template’s properties like NICs and details, ensuring that it meets the specific requirements for deploying VNF within your infrastructure.
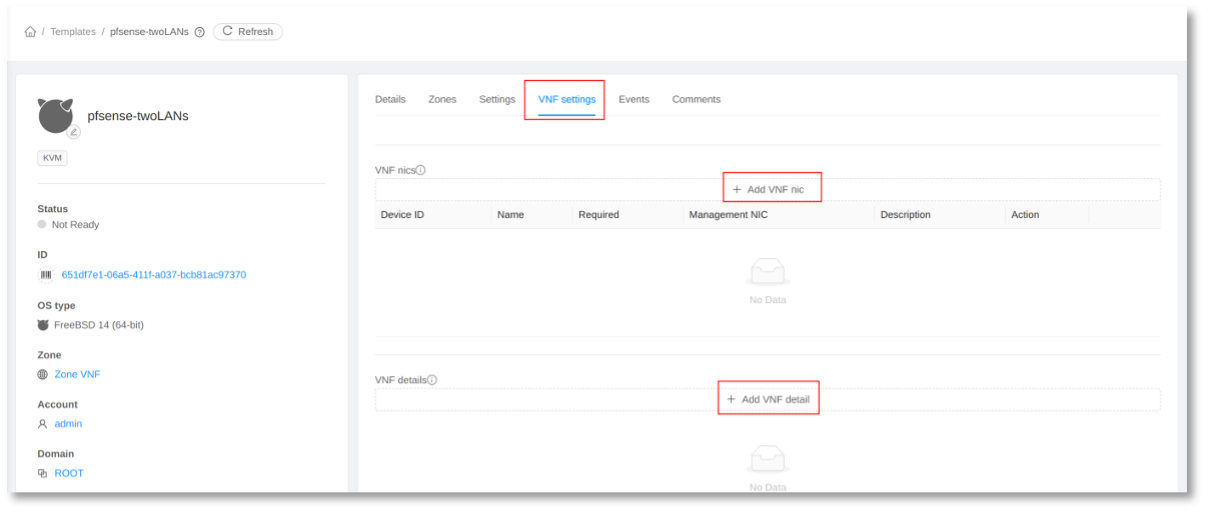
• VNF NICs
To add VNF NICs (Network Interface Controllers), click on the “Add VNF nic” button. This action allows you to configure the network interfaces for the VNF Template, enabling it to connect to various network segments as required for its operation.
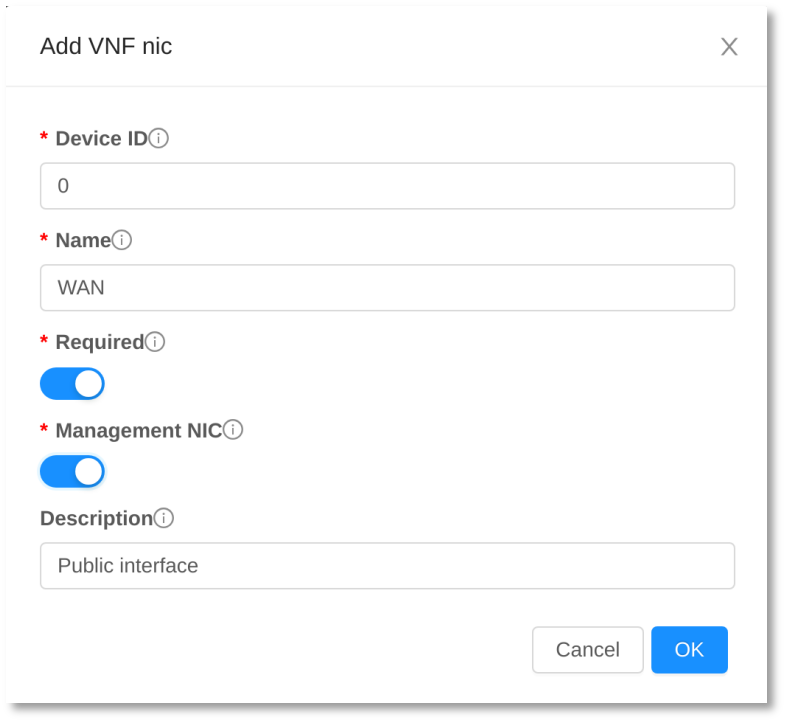
When adding VNF NICs, the following parameters are supported to ensure precise configuration:
| Parameter | Description |
| deviceid | This is the device ID of the VNF NIC. It’s important that the device IDs are consecutive and start from 0 to ensure proper identification and ordering of the network interfaces. |
| name | The name of the VNF NIC, which helps in identifying the interface within the configuration and management contexts. |
| required | This parameter should be set to True if the VNF NIC is essential for the operation of the VNF appliance. If a NIC is optional, this parameter should be False. Note that a NIC cannot be marked as required if a preceding NIC in the sequence is optional, to maintain dependency integrity. |
| management | Set this to True if the VNF NIC serves as a management interface, which is used for administrative access and control of the VNF appliance. If the NIC is not used for management purposes, set this to False. |
| Description | A brief description of the VNF NIC, providing additional details such as its purpose, configuration specifics, or any other relevant information that aids in understanding its role within the VNF Appliance. |
These parameters allow for detailed and flexible configuration of network interfaces on VNF Appliances, catering to a wide range of network setups and requirements.
• Adding VNF Details
VNF Details is used to parameterise the Template so that once a VNF Instance is launched, this information will be used to inform users about VNF credentials and the URL to access the endpoint. The parameters supported include:
| Parameter Name | Value |
| access_methods | console, http, https, ssh-key, ssh-password |
| username | String |
| password | String |
| ssh_user | String |
| ssh_password | String |
| ssh_port | Integer |
| web_user | String |
| web_password | String |
| http_path | String |
| http_port | Integer |
| https_path | String |
| https_port | Integer |
| maintainer | String |
| vendor | String |
| version | String |

Deploying a VNF Appliance
Once the VNF Template is set up, users are able to deploy a VNF Appliance according to this Template. pfSense offers capabilities to link instances across various networks, enabling functionalities like routing, firewall, VPN, and many other network services.
To deploy a VNF Appliance, first, log into the CloudStack UI either as an admin or as a regular user, navigate to the ‘Network’ section from the left-hand menu and select ‘VNF Appliances’. Finally, click on the ‘Add VNF Appliance’ button to initiate the VNF creation wizard.
Select a VNF Template and a Service Offering, and choose the Networks you want to add to the VNF Appliance.

In the ‘VNF NICs’ section, select the appropriate network for each VNF NIC to use.
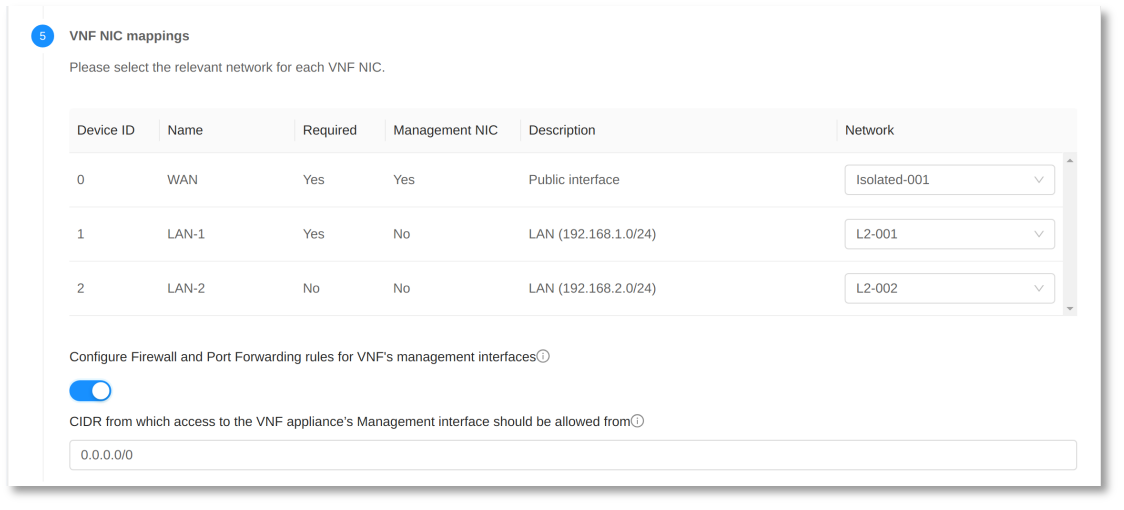
When the management network is either an Isolated Network or a Shared Network with Security Groups, the following parameters are supported:
| Parameter | Description |
| Configure Rules for VNF Management Interfaces | This parameter allows the configuration of rules for VNF management interfaces. By default, this setting is disabled (False). |
| Source CIDR List of Rules | Specifies the CIDR (Classless Inter-Domain Routing) list that is allowed to forward traffic to the VNF management interface. If you need to enter multiple CIDR blocks, separate them with a comma (,). The default setting for this parameter is ‘0.0.0.0/0’, which allows traffic from all IP addresses. |
Network rules are applied based on the type of VNF management network configured for the VNF Appliance:
| Management Network Type | Description |
| Isolated Network | If the management network is an isolated network, CloudStack will secure a public IP for the appliance, enable Static NAT on the VNF appliance, and establish firewall rules. These rules facilitate traffic to SSH, HTTP, and HTTPS ports according to the ‘access methods’ specified in the VNF template details. |
| Shared Network with Security Groups | For a management network configured as a shared network with security groups, CloudStack will generate a new security group. This group will contain rules that permit traffic to SSH, HTTP, and HTTPS ports, aligning with the ‘access methods’ outlined in the VNF template details. This security group is then assigned to the VNF appliance. |
| L2 Network, VPC Tier, or Shared Network Without Security Groups | In cases where the management network is a Layer 2 (L2) network, a VPC tier, or a shared network lacking security groups, CloudStack will not set up any network rules. |
Now, proceed by clicking the ‘Launch VNF Appliance’ button. Upon successful deployment of the VNF appliance, it will be visible on the ‘VNF Appliances’ page.

After launching the VNF Appliance, you can view the management access information on the details page of the VNF Appliance.
Verification Steps
1. Create an Instance on each of the L2 networks. Ensure that the Instances are up and running before proceeding to the next step.
2. Check network connectivity as follows:
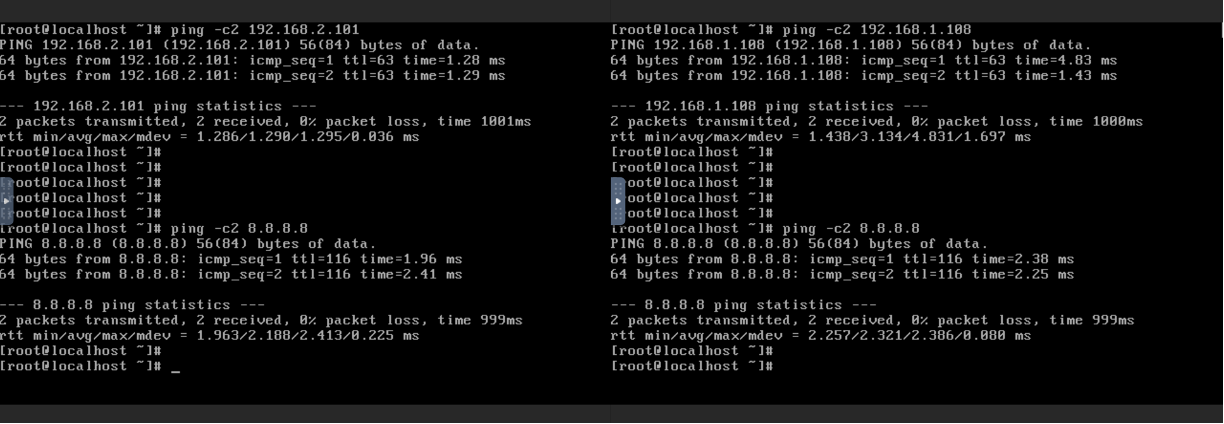
• From the Instance on network L2-001, verify that it can successfully ping the Instance on network L2-002 and also access the public Internet.
• Similarly, from the Instance on network L2-002, ensure that it can ping the Instance on network L2-001 and access the public Internet as well.
These steps will help confirm that the network configurations are correctly set up and that Instances on different L2 networks can communicate with each other and the wider Internet.
Conclusion
Introducing the VNF Appliances feature in Apache CloudStack 4.19 enables Users to manage their own VNF devices. This functionality is versatile, allowing for a wide range of network functions to be implemented and managed directly by Users.
Compared to traditional CloudStack virtual routers, VNF appliances offer a broader range of network functionalities, alongside additional benefits such as improved performance, enhanced management tools, user-friendly web interfaces, and more.
Wei Zhou works as a Software Architect at ShapeBlue. He has many years experience on cloud computing and a passion for various cutting-edge knowledge. Wei works on software design and implementation, as well as resolving issues for customers and community users. Wei has been a committer of the Apache CloudStack project since 2013 and a PMC member since 2017.
