Introduction
In this article Abhinandan Prateek discusses a method for allowing inter-VPC routing in CloudStack utilising Quagga on the VPC Virtual Router. Please note – this feature is currently in development, this is being considered for release in CloudStack 4.10 (please refer to upcoming release notes for details).
In CloudStack a VPC acts as a container for multiple isolated networks that can communicate with each other via its virtual router (VPC-VR). A VPC can have its own virtual network topology resembling a traditional multi-tier physical network that it is substituting itself for. The following figure shows a typical CloudStack VPC with three tiers. The traffic flows from one tier to another is via VPC virtual router (VPC-VR), which acts as the default gateway for each tier. CloudStack manages the traffic flow by configuring the firewall rules on the virtual router. Any communication that goes in and out of VR to the public network requires network address translation (NAT-ing).
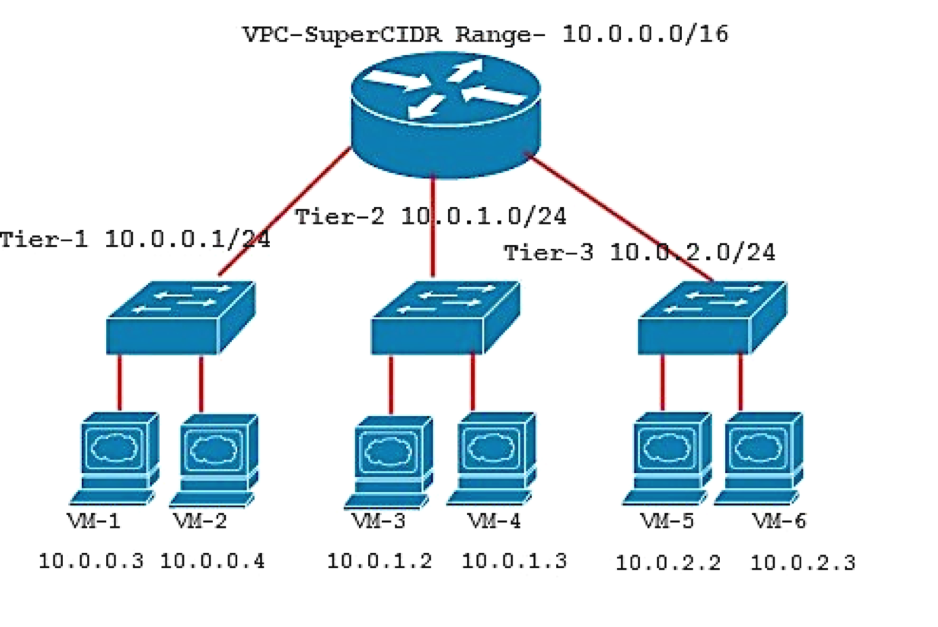
Figure 1: Cloudstack VPC with three tiers
In large organisations where the end-to-end access is a requirement, the current VPC model brings more complexity to management and hands-on configuration beside the overhead involved in the NAT address translations processing. In these kind of enterprise environments, the VR needs to route networks using both public and private IP addresses. This requires advance configuration that involves NAT-ing – which in itself brings in its own overheads.
This article explains an approach that will make the NAT-ing unnecessary because the networks will be routed and announced dynamically using the Open Shortest Path First (OSPF) protocol. There are several implementations of OSPF on Linux like gated, zebra and quagga. After some initial comparison it was decided that we will use Quagga on VPC-VR to provide OSPF implementation.
Quagga is an advanced software routing package which provides a suite of TCP/IP-based routing protocols and provides implementations of OSPFv2, OSPFv3, RIP v1 and v2, RIPng and BGP-4 for Unix-like platforms, particularly FreeBSD, Linux, Solaris and NetBSD. The Cloudstack VPC-VR will use quagga to configure inter-VPC dynamic routing. Quagga implements OSPF (v2, v3) and is found suitable to run on the Debian based VPC virtual router to provide dynamic routing.
When a new network is added, OSPF protocol running on the VPS-VR is instrumented by CloudStack to advertise the newly added network to other VPC-VRs that are part of the physical network as shown in Figure 2. The OSPF protocol running on VPC routers in conjunction with the core-routers will take care of routing between different VPC’s as well as public network in most efficient manner.
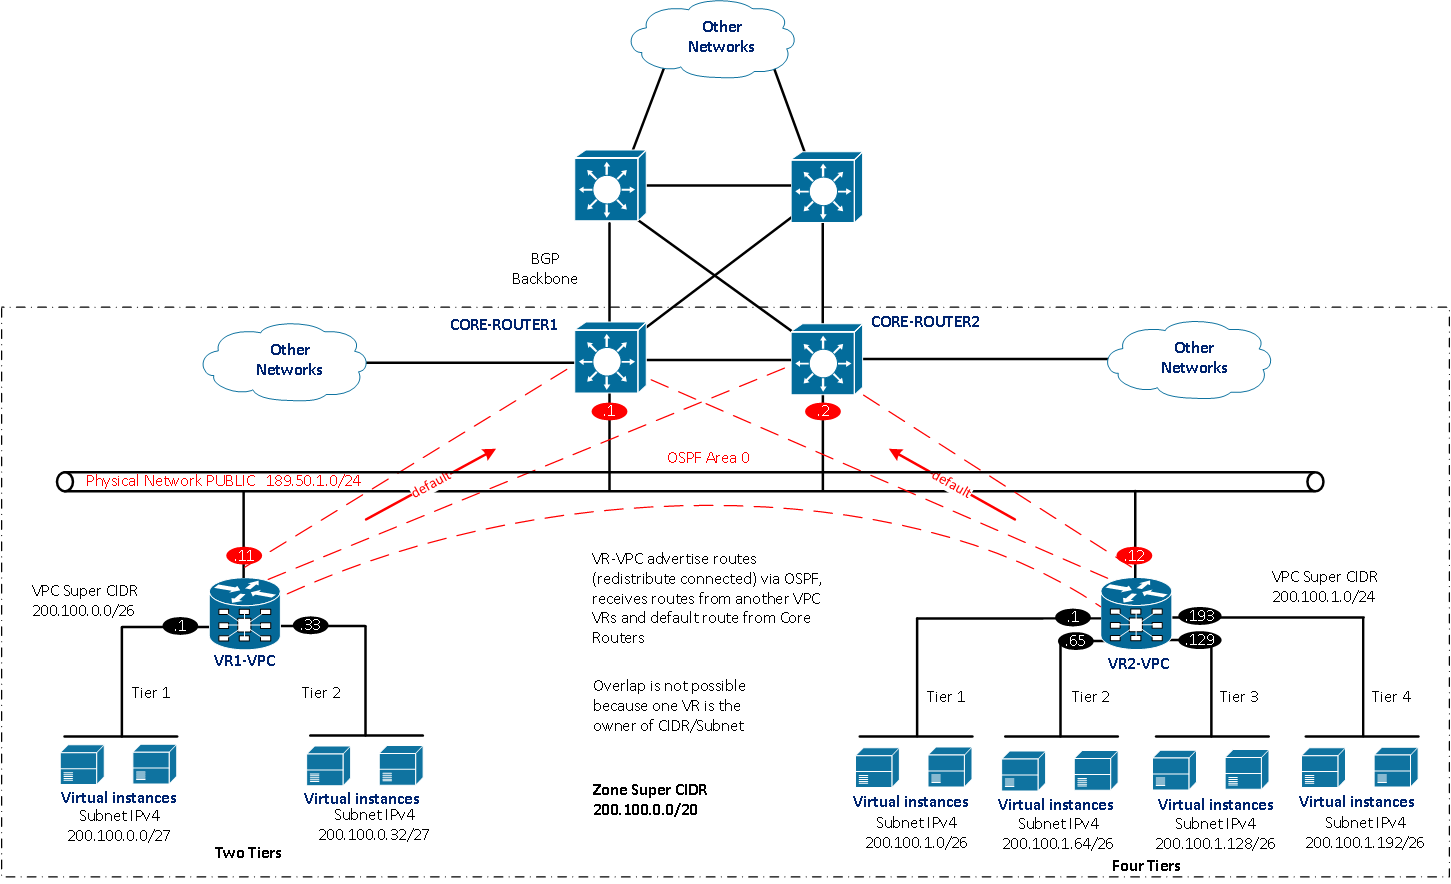
Figure 2: VPC-VRs advertising routes on physical network
For CloudStack to configure Quagga running on VPC-VR the most important piece of information is the distribution of subnets between various VPCs. These subnets are part of a unique super subnet defined at zone level. We will refer to it as the Zone Super-CIDR. CloudStack manages this zone level Super-CIDR, and when a new VPC is being created, it carves out a subnet for that VPC from this Zone Super-CIDR.
Dynamic VPC addressing scheme
In order a user VM that is part of a dynamically routed VPC to be able to address another, the IP addresses are carved out from the same network. This section describes how CloudStack manages the IP addressing scheme.
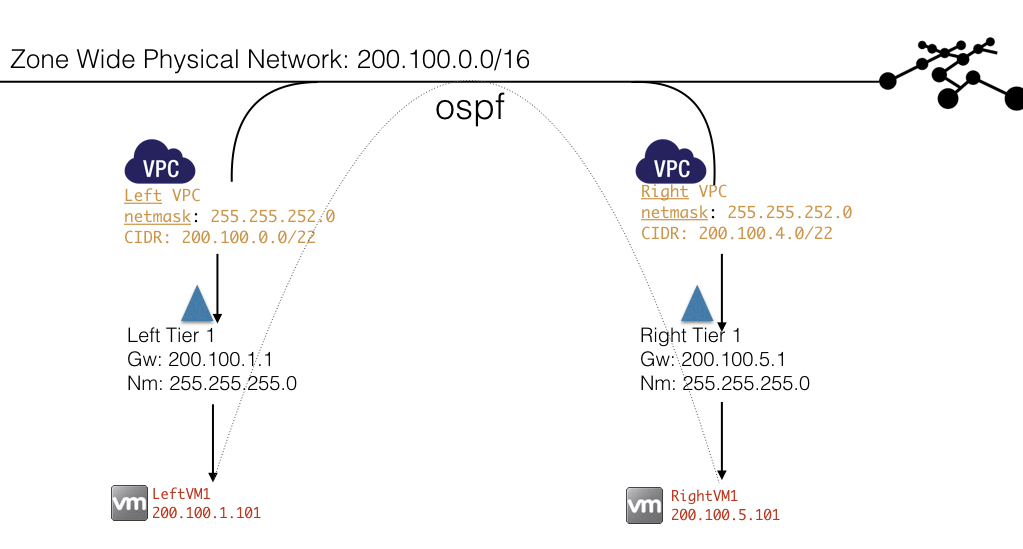
Figure 3: Address allocation for VMs across two VPC tiers
In Figure 3, the Zone Wide Super CIDR is 200.200.0.0/16. The two VPC in Figure 3, requested a /22 subnet. CloudStack carved out 200.100.0.0/22 and 200.100.4.0/22 for these VPC referred to as Left and Right VPCs respectively.
Two tiers Left and Right were further created below the two VPCs and allocated 200.100.1.0/24 and 200.100.5.0/24 respectively, from the subnet of their parent VPC. The newly created VMs then take the IP address from the VPC-tier’s subnet. These are 200.100.1.101 for LeftVM1 and 200.100.5.101 from RightVM1.
Please note the above super-CIDR partitioning scheme is an example only. The selection of super-CIDR and subsequent partitioning of it is user driven.
Some of the operators may want their users to have public IP assigned to their VPC-VMs. To facilitate that CloudStack will allow both private and public class super-CIDRs to be specified for the zone.
Now that CloudStack has worked out the addressing scheme all that remains is passing the subnet and addresses along with some more configuration information to the VPC VR. The information is synchronized whenever a new network is created or changes are made to existing VPCs. In OSPF terminology a CloudStack VPC is referred to as a unique area, identified by an area id. CloudStack generates these unique area ids. Some of the other additional information is about various timeouts and authentication parameters.
Using OSPF in Cloudstack
With OSPF implementation following is the methodical way to create dynamic VPCs in cloudstack:
Enable OSPF in the zone
Login as admin and then go-to: Infrastructure->Zones, select the zone in which you want to enable OSPF and click the tab “Dynamically Routed”. You will be asked to select some options. Most important of these option is zone level Super-CIDR. You need to set it as per your setup and needs.

Figure 4: Dynamically routed zones have a button to ‘Add Routed VPC’
Service offerings
The default service offerings to create VPC and VPC tier are provided by CloudStack. In addition, you can create your own custom service offerings that are dynamically routed as described below.
Create Dynamic VPC Service Offering
Go to Service Offerings and then select VPC Offering. From here you can add VPC Offering. One of the supported services should be “VPCDynamicRouting” in order for the VPC to be dynamically routing enabled.
Create Dynamic VPC Network tier offering
Go-to Service Offerings and then select Network Offering. From here you can add Network Offering. Select “VPC” and add “VPCDynamicRouting” as one of the supported services.
Create VPC

Now you can create dynamically routed VPCs by selecting the dynamic service offering for VPC. In a regular VPC you need to provide a CIDR, but since in dynamically routed VPC the VPCs will get a share from the zone level super CIDR. So instead of a CIDR you need to specify a netmask, CloudStack allocates a suitable subnet that caters to the netmask that you specified. In case no such range exists the VPC creation fails.
Create VPC tiers

Create a dynamic VPC tier by selecting the dynamic network offering. You need to provide gateway and netmask. CloudStack will automatically carve out the subnet from the VPC CIDR.
Create ACLs
To provide access across tiers create appropriate ACL rules to allow traffic to the VMs.
Create User VM
Create VMs in the dynamic tiers. User VMs will now get an ip allocated to them from their tier subnet. These VMs can reach out to other VMs on different VPC if appropriate ACLs are configured to allow the traffic.
VPC VR
You can login into the VPC virtual router, refer to CloudStack documentation on how to do that. Following are some interesting quagga commands and sample output that will show you OSPF in action.
$vtysh -c "show ip ospf neighbor"
Neighbor ID Pri State           Dead Time Address         Interface            RXmtL RqstL DBsmL
192.168.100.68    1 Full/DR           34.090s 192.168.100.68  eth1:192.168.100.67      0     0     0


$vtysh -c "show ip ospf route"
============ OSPF network routing table ============
N    200.200.1.0/24         [10] area: 0.0.0.67
directly attached to eth2
N    200.200.2.0/24         [10] area: 0.0.0.67
directly attached to eth3
N IA 200.200.5.0/24         [20] area: 0.0.0.0
via 192.168.100.68, eth1
N IA 200.200.6.0/24         [20] area: 0.0.0.0
via 192.168.100.68, eth1
N    200.200.100.0/24      [10] area: 0.0.0.0
directly attached to eth1
============ OSPF router routing table =============
R    192.168.100.68        [10] area: 0.0.0.0, ABR, ASBR
via 192.168.100.68, eth1
============ OSPF external routing table ===========
With this approach and with some settings on your core router you can dynamically route internet traffic to public ip addresses within the VPCs. Dynamic routing also simplifies the book keeping done by CloudStack in persisting and applying the routing information.
About The Author
Abhinandan Prateek is a Software Engineer at ShapeBlue, The Cloud Specialists. Abhi spends his time developing solutions for the CloudStack community as well as for our ShapeBlue clients.
Giles is CEO and founder of ShapeBlue and is responsible for overall company strategy, strategic relationships, finance and sales.
He is also a committer and PMC member of the Apache CloudStack project and Chairman of the European Cloudstack User Group, actively helping promote brand awareness of the technology.
Giles can regularly be heard speaking at events around the globe, delivering visionary talks on cloud computing adoption and more specifically on Cloudstack technologies.
Before ShapeBlue, Giles held C-Level technology positions for 15 years including founder and CEO of Octavia Information Systems, a leading UK Managed Service Provider.
Giles holds a BSc in Engineering Physics from Sheffield Hallam University. Outside work, Giles is married with two teenage children. He coaches children’s rugby, is a competitive masters swimmer and can regularly be seen crying when his beloved Tottenham Hotspur lose.

